Office 365
- 65.002 Outlook: Change path of Outlook OST file in the registry
- 65.005 Teams Calling: DTMF tones are accepted by the keypad but not sent
- 65.008 Outlook: How to move Outlook's navigation bar from left side back to the bottom
- 65.011 OneDrive: OneDrive Shortcut vs OneDrive sync
- 65.015 Setting up Microsoft Outlook via IMAP / SMTP
65.002 Outlook: Change path of Outlook OST file in the registry
Docs |
Document Control
|
Document Name |
65.002 Outlook: Change path of Outlook OST file in the registry |
||
|
Version |
v1.0 Current |
||
|
Author |
Neil Tancock, IT Services (Safeharbour Support Ltd), neil@safeharboursupport.com |
||
|
Approval |
Safeharbour Support |
||
|
Approval date |
01-JAN-2025 |
Review date |
31-DEC-2027 |
|
Absract |
Change path of Outlook OST file in the registry |
||
|
Scope |
This document applies to all clients of Safeharbour Support Ltd |
||
|
Inputs |
None |
||
|
Outputs |
None |
||
Change Control
|
Date |
Author |
Version |
Change |
|
02-DEC-2024 |
Neil Tancock |
0.0 |
First version |
|
01-JAN-2025 |
Neil Tancock |
1.0 |
Approved |
--------------------------------------------<START OF DOCUMENT> --------------------------------------------
- Close the MS Outlook email client.
- Press the Windows + R button, type regedit, and then press Enter.
- Navigate through the following registry path: HKEY_CURRENT_USER\Software\Microsoft\Office\version number\Outlook.
- Right-click the Outlook sub key, point to New, and then click the Expandable String Value option.
- Specify ForceOSTPath. Press the Enter key.
- Right-click the newly-created ForceOSTPath. Click the Modify option.
- Specify OST file path for saving in the Value box. Click the OK button.
- Exit the registry editor.
https://www.nucleustechnologies.com/how-to/change-ost-location.html#:~:text=Navigate%20through%20the%20following%20registry,Press%20the%20Enter%20key.
--------------------------------------------<END OF DOCUMENT> --------------------------------------------
|
Need help? Get in touch! |
|
You can call us on 01752 373000, option 2 or, if you are on Number Club, just call extension 3001 You can email us at hub@safeharboursupport.com You can Whatsapp us right here: https://wa.me/441752373000 |
|
|
65.005 Teams Calling: DTMF tones are accepted by the keypad but not sent
Docs |
Document Control
|
Document Name |
65.005 Teams Calling: DTMF tones are accepted by the keypad but not sent |
||
|
Version |
v1.0 Current |
||
|
Author |
Neil Tancock, IT Services (Safeharbour Support Ltd), neil@safeharboursupport.com |
||
|
Approval |
Safeharbour Support |
||
|
Approval date |
01-JAN-2025 |
Review date |
31-DEC-2027 |
|
Absract |
When a call is made or received in Microsoft Teams and user reaches a voice menu (IVR) they are unable to enter the key tones (DTMF tones) to choose an option. |
||
|
Scope |
This document applies to all clients of Safeharbour Support Ltd |
||
|
Inputs |
None |
||
|
Outputs |
None |
||
Change Control
|
Date |
Author |
Version |
Change |
|
02-DEC-2024 |
Neil Tancock |
0.0 |
First version |
|
01-JAN-2025 |
Neil Tancock |
1.0 |
Approved |
--------------------------------------------<START OF DOCUMENT> --------------------------------------------
When a call is made or received in Microsoft Teams and user reaches a voice menu (IVR) they are unable to enter the key tones (DTMF tones) to choose an option.
The dialled numbers appear in the dialpad, but no sound is heard and no digits are sent.
This is a known issue with the Teams Calling client. To resolve it, please open the embedded dialpad when you are on the call:


--------------------------------------------<END OF DOCUMENT> --------------------------------------------
|
Need help? Get in touch! |
|
You can call us on 01752 373000, option 2 or, if you are on Number Club, just call extension 3001 You can email us at hub@safeharboursupport.com You can Whatsapp us right here: https://wa.me/441752373000 |
|
|
65.008 Outlook: How to move Outlook's navigation bar from left side back to the bottom
Docs |
Document Control
|
Document Name |
65.008 Outlook: How to move Outlook's navigation bar from left side back to the bottom |
||
|
Version |
v1.0 Current |
||
|
Author |
Neil Tancock, IT Services (Safeharbour Support Ltd), neil@safeharboursupport.com |
||
|
Approval |
Safeharbour Support |
||
|
Approval date |
01-JAN-2025 |
Review date |
31-DEC-2027 |
|
Absract |
For some users of Outlook, the latest release of Office, you may find the navigation bar no longer reside at the bottom. Instead, the navigation bar is moved to the upper left side of the Outlook window. Some may feel it is a good update, but many may be accustomed to the old style and prefer to use that. There is a way to return the navigation bar from the left side to the bottom once more. |
||
|
Scope |
This document applies to all clients of Safeharbour Support Ltd |
||
|
Inputs |
None |
||
|
Outputs |
None |
||
Change Control
|
Date |
Author |
Version |
Change |
|
02-DEC-2024 |
Neil Tancock |
0.0 |
First version |
|
01-JAN-2025 |
Neil Tancock |
1.0 |
Approved |
--------------------------------------------<START OF DOCUMENT> --------------------------------------------
For some users of Outlook, the latest release of Office, you may find the navigation bar no longer reside at the bottom. Instead, the navigation bar is moved to the upper left side of the Outlook window. Some may feel it is a good update, but many may be accustomed to the old style and prefer to use that. There is a way to return the navigation bar from the left side to the bottom once more.

To move the navigation bar
1. Open Outlook, you can see the navigation bar is located on the upper left side:

2. Hold down the Windows key and R key on your keyboard to open the Run dialog box. Input regedit in the Open box. Then click OK.

3. Then a User Account Control dialog box pops up. Click the Yes button to continue.

4. In the Registry Editor window, navigate to the following path: HKEY_CURRENT_USER\SOFTWARE\Microsoft\Office\16.0\Common\ExperimentEcs\Overrides

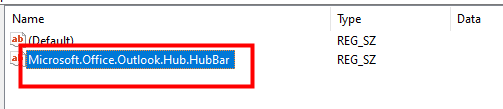
5. Locate and click the “Microsoft.Office.Outlook.Hub.HubBar” string value in the Name column in the right section of the page. Then set the Value data to false.

But in my case, the “Microsoft.Office.Outlook.Hub.HubBar” string value in this registry key doesn’t exist. So I should create a new string value named “Microsoft.Office.Outlook.Hub.HubBar” in this location first.

6. To create the “Microsoft.Office.Outlook.Hub.HubBar” string value, please right-click on the Overrides folder, then click New > String Value in the popped-up menu lists.

7. Copy and Paste “Microsoft.Office.Outlook.Hub.HubBar” in the text box.
Tip: If the name of the string value is not in editable mode, please right click it and select Rename from the context menu.

8. Double-click on the newly created string value. The Edit String dialog pops up. Type “false” in the Value data box. Then click OK.

Now restart Outlook. You will see the Navigation bar is back at the bottom of the Outlook page like it used to be.

Note: If you want to restore the left-side navigation bar setting, just locate the “Microsoft.Office.Outlook.Hub.HubBar” string value in the Registry Editor window, right-click on it, and click Delete.

--------------------------------------------<END OF DOCUMENT> --------------------------------------------
|
Need help? Get in touch! |
|
You can call us on 01752 373000, option 2 or, if you are on Number Club, just call extension 3001 You can email us at hub@safeharboursupport.com You can Whatsapp us right here: https://wa.me/441752373000 |
|
|
65.011 OneDrive: OneDrive Shortcut vs OneDrive sync
Docs |
Document Control
|
Document Name |
65.011 OneDrive: OneDrive Shortcut vs OneDrive sync |
||
|
Version |
v1.0 Current |
||
|
Author |
Neil Tancock, IT Services (Safeharbour Support Ltd), neil@safeharboursupport.com |
||
|
Approval |
Safeharbour Support |
||
|
Approval date |
01-JAN-2025 |
Review date |
31-DEC-2027 |
|
Absract |
What is the difference between Add Shortcut to OneDrive and OneDrive sync? |
||
|
Scope |
This document applies to all clients of Safeharbour Support Ltd |
||
|
Inputs |
None |
||
|
Outputs |
None |
||
Change Control
|
Date |
Author |
Version |
Change |
|
02-DEC-2024 |
Neil Tancock |
0.0 |
First version |
|
01-JAN-2025 |
Neil Tancock |
1.0 |
Approved |
--------------------------------------------<START OF DOCUMENT> --------------------------------------------
Having been born in the former Soviet Union and having spent my teenage years there in the late 80s and early 90s, I am not used to having too many choices in life. In a way, it made life simpler – you go to the store – there is just one kind of milk (if at all), so you don’t spend too much time guessing which one to buy – because if you wait too long – it will be gone.
Now that I consult and train clients on SharePoint, I always draw a parallel and can see how having too many choices can confuse the hell out of people. One of the frequent questions I have been getting lately is how the new Add Shortcut to OneDrive is different from OneDrive sync. They imply the same thing, but what exactly is the difference? Should I use one or another? My friend, I am glad you are asking these questions, because I am here to help you answer them!
WHAT IS ONEDRIVE SYNC?
Let’s start with OneDrive Sync since it has been around for a while. OneDrive sync is the application you install on your computer that allows you to synchronize the entire library to your computer and be able to access the files from the convenience of your Windows Explorer or a Mac. I explained this feature in great detail here.

WHAT IS ADD SHORTCUT TO ONEDRIVE?
Add Shortcut to OneDrive is a new feature recently added to SharePoint Document Libraries that allows users to bookmark folders within a library or an entire library to their OneDirve, making the shortcut available within the OneDrive application. And, of course, I documented this feature as well for you here.

WHAT IS THE DIFFERENCE BETWEEN ADD SHORTCUT TO ONEDRIVE AND ONEDRIVE SYNC?
So the primary difference between Add Shortcut to OneDrive and OneDrive sync is that the former does not sync anything to your computer; it just creates a link/bookmark to the content in your OneDrive for Business. In contrast, the latter takes care of the synchronization (download and sync) of SharePoint document libraries as well as OneDrive for Business to the user’s computer (desktop).
HOW DO ADD SHORTCUT TO ONEDRIVE AND ONEDRIVE SYNC WORK TOGETHER?
So far, so good, right? Well, let me complicate things a bit for you. The confusion occurs when you use both Add Shortcut to OneDrive and OneDrive Sync together. The experience for you will depend on what exactly it is that you synchronize. Let me explain the various scenarios to you.
Scenario 1:
- You Added a shortcut to OneDrive for one of the folders
- You synchronized just the SharePoint Document Library (but not OneDrive for Business)

No issues here. When you Add a shortcut to OneDrive – the link will appear in your OneDrive for Business Application…

…and your Synchronized Document Library will appear in your list of synchronized Document Libraries locally on your PC.

Scenario 2:
- You Added a shortcut to OneDrive for one of the folders
- You synchronized just your OneDrive for Business (but not the SharePoint document library where the shortcut was created from)
If you Added a shortcut to OneDrive and then decided to synchronize just OneDrive for Business (but not the Document library you created a shortcut from) using OneDrive Sync, you will get your OneDrive for Business files and folders synchronized locally to your PC. The folder or a library that you happened to bookmark from SharePoint will be synchronized as well. It will appear as a folder icon with a person icon overlaid on top of it. Once again – no issues here.

Scenario 3:
And this brings us to the third and fourth scenarios. You know how in movies, when there is a scary scene approaching, you typically hear the corresponding music that warns you that something bad or scary is about to happen? Well, this is the kind of scene in my post where such music would be appropriate. Here is the scenario:
- You Added a shortcut to OneDrive for one of the folders
- You synchronized your OneDrive for Business first
- You then try to sync the SharePoint Document library where the shortcut was created from
You will get this lovely message: Sorry, we can’t sync this folder. You’re already syncing a shortcut to a folder from this shared library.

To address this, you would need to remove the shortcut from OneDrive first, then sync the SharePoint Document Library.
Scenario 4:
This one is even worse…
- You synchronized both your OneDrive for Business and a SharePoint document library
- You Added a shortcut to OneDrive for one of the folders
or…
- You Added a shortcut to OneDrive for one of the folders in a SharePoint document library
- You synchronized the above SharePoint Document Library
- You then try to sync OneDrive for Business as well
In both cases above, you will get this lovely message: Unable to sync shortcut.

The problem with this specific message is that to resolve the conflict, it is asking you to Unsync conflicting folder. When you press this button, it stops the synchronization of the ENTIRE SharePoint Document Library! So in an instant and most of the time, unintentionally, you will stop the sync of the entire library! This will lead to loss of data and any changes you make going forward!!!
To prevent this disaster from happening, what you need to do is go to your OneDrive for Business, and remove the Shortcut from there.

Then wait a minute so that OneDrive for Business “catches up and tries to resync”, the error message and the red X over the cloud icon will then go away. I wish the error message allowed for this graceful workaround instead of unsyncing the whole damn library.![]()
Long story short – you have to be really careful when using both Add Shortcut to OneDrive and OneDrive Sync. While both features are unique and different, using them together can be quite toxic!
--------------------------------------------<END OF DOCUMENT> --------------------------------------------
|
Need help? Get in touch! |
|
You can call us on 01752 373000, option 2 or, if you are on Number Club, just call extension 3001 You can email us at hub@safeharboursupport.com You can Whatsapp us right here: https://wa.me/441752373000 |
|
|
65.015 Setting up Microsoft Outlook via IMAP / SMTP
Docs |
Document Control
|
Document Name |
65.015 Setting up Microsoft Outlook via IMAP / SMTP |
||
|
Version |
v1.0 Current |
||
|
Author |
Neil Tancock, IT Services (Safeharbour Support Ltd), neil@safeharboursupport.com |
||
|
Approval |
Safeharbour Support |
||
|
Approval date |
01-JAN-2025 |
Review date |
31-DEC-2027 |
|
Absract |
Most people are familiar with Microsoft Outlook and how simple it is to connect to a Microsoft 365 email account. But what if you're not using Microsoft 365 (Also know as Office 365)? It's still possible to connect Outlook to non-Microsoft email accounts using some settings called IMAP and SMTP. This article will guide you through setting up Outlook 2016 with your email service. |
||
|
Scope |
This document applies to all clients of Safeharbour Support Ltd |
||
|
Inputs |
None |
||
|
Outputs |
None |
||
Change Control
|
Date |
Author |
Version |
Change |
|
02-DEC-2024 |
Neil Tancock |
0.0 |
First version |
|
01-JAN-2025 |
Neil Tancock |
1.0 |
Approved |
--------------------------------------------<START OF DOCUMENT> --------------------------------------------
What you will need before you start
When your email account was set up, you will have been received your email account credentials:
Username: Your email username, which is also your email address.
Password: Your email account password.
IMAP Server: This is the email server that holds your incoming emails for you.
SMTP Server: This is the server Outlook uses to send emails.
In this example, we are going to use these credentials:
Username: test@geekcollective.co.uk
Password: hh812h24!&oaisrg
IMAP Server: imap.geekcollective.co.uk
SMTP Server: smtp.geekcollective.co.uk
Adding the account
In Outlook, click on the File menu, then Account Settings, then Account Settings again. This will present you with a list of email accounts currently connected to your Outlook. Click on [New....] and then wait while Outlook looks for new accounts. When it presents you with the Outlook dialogue box:
- Enter your email in the email address field
- Click on Advanced options
- Put a tick in "Let me set up my account manually"
- Click the [Connect] button
In the Advanced setup box that follows, click on IMAP
In the IMAP Account settings panel, enter your account details:
- Incoming mail:
- Server: enter your IMAP server name
- Port: enter 993
- Encryption method: Click on None and then choose SSL/TLS from the picklist
- Outgoing mail:
- Server: enter your SMTP server name
- Port: enter 465
- Encryption method: Click on None and then choose SSL/TLS from the picklist
Then click [Next]
In the second IMAP account settings panel, enter your password and then click [Connect]
In the third IMAP account settings panel, enter the email password and click [Connect]
Outlook will then connect to the email server and confirm a successful connection. Click on [Done] to complete the process.
--------------------------------------------<END OF DOCUMENT> --------------------------------------------
|
Need help? Get in touch! |
|
You can call us on 01752 373000, option 2 or, if you are on Number Club, just call extension 3001 You can email us at hub@safeharboursupport.com You can Whatsapp us right here: https://wa.me/441752373000 |
|
|