SmarterMail
- 65.026 How to implement Two-factor authentication on SmarterMail
- 65.027 How to configure SmarterMail on Android Mail app using IMAP
- 65.028 How to configure SmarterMail on your Android device using Exchange
- 65.029 How to configure SmarterMail on Outlook using Exchange
- 65.030 How to configure SmarterMail on Outlook using IMAP
- 65.031 How to configure SmarterMail on iPhone or iPad using IMAP
- 65.047 How to configure SmarterMail on the Android Gmail app using IMAP
65.026 How to implement Two-factor authentication on SmarterMail
Docs |
Document Control
|
Document Name |
65.026 How to implement Two-factor authentication on SmarterMail |
||
|
Version |
v1.0 Current |
||
|
Author |
Neil Tancock, IT Services (Safeharbour Support Ltd), neil@safeharboursupport.com |
||
|
Approval |
Safeharbour Support |
||
|
Approval date |
01-JAN-2025 |
Review date |
31-DEC-2027 |
|
Absract |
This guide will help you secure your SmarterMail email account from attackers by enabling two-factor authentication. Two-factor authentication involves and extra security step when you log on to ensure that it really is you logging in and not someone who has stolen or guessed your password. |
||
|
Scope |
This document applies to all clients of Safeharbour Support Ltd |
||
|
Inputs |
None |
||
|
Outputs |
None |
||
Change Control
|
Date |
Author |
Version |
Change |
|
02-DEC-2024 |
Neil Tancock |
0.0 |
First version |
|
01-JAN-2025 |
Neil Tancock |
1.0 |
Approved |
--------------------------------------------<START OF DOCUMENT> --------------------------------------------
01 Preparing to start
Before we start, you will need:
- An authenticator app
- A recovery email address
Authenticator App
An authenticator app installed on your mobile phone or tablet. It is this app that will provide the second-step security code you will need to log on. Several authenticator apps are available and you may already be using one. The most commonly-used ones are:
- Google Authenticator
- Microsoft Authenticator
- Okta
- Authy
If you already have an authenticator app installed on your device you can use that without installing another
Recovery email address
A recovery email address is typically a personal email address not associated with this email server. It is used to recover your account if you forget your password.
02 Enabling Two-Factor authentication
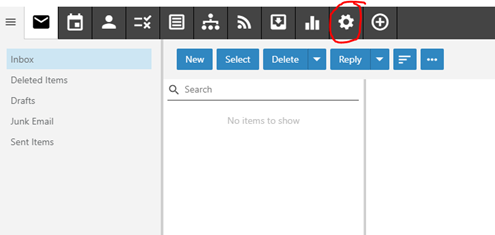
You can enable two-factor authentication yourself from the webmail portal. You will have been given the URL of your portal when we set it up for you. Once you have logged in to the webmail portal, click on the settings button:
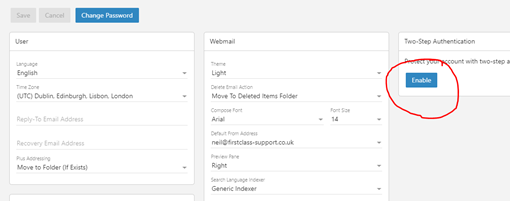
On the right-hand side of the settings page, you will see a button to enable two-factor authentication. Check that you have your authenticator app to hand and your recovery email, then click on the button to start the setup process.
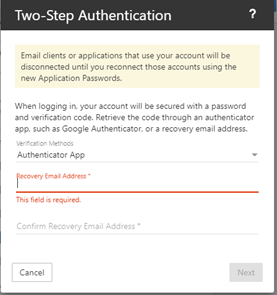
The first step requires you to enter your recovery email. Type it in once and then again to confirm it and then press [Next]
You will then be presented with a special barcode called a QR code to scan into your authenticator app. Open the app and click on the button to add using a QR code. This will enable the camera on your phone so point the camera at the QR code and the app will read it.

Once the authenticator app has read the QR code and added your email account, it will produce a six-digit verification code. Enter this code into the Verification Code field in the two-factor authentication setup window and click [Check].
That’s it. You have enabled two-factor authentication on your email account. Each time you log in to the webmail portal, the authenticator app will give you your secret six-digit code to log in. This is two-factor authentication.
03 Re-authenticating email on your phone or tablet
As a security precaution, any phone or tablet you have connected to your email will be logged out once you have set up two-factor authentication. Thankfully, you will not have to use the app every time you want to use email on your phone or tablet. You will use a special, very complex password.
Getting the password for your mobile or tablet
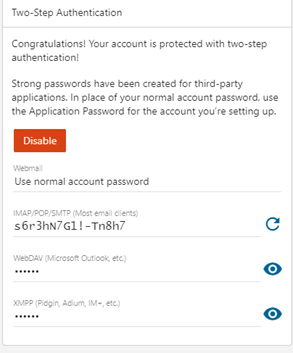
Once you have set up two-factor authentication in your webmail portal there will be several new secure passwords created. We want the first on in the list for IMAP/POP/SMTP.
Click on the eye icon next to the IMAP/POP/SMTP password to reveal it:
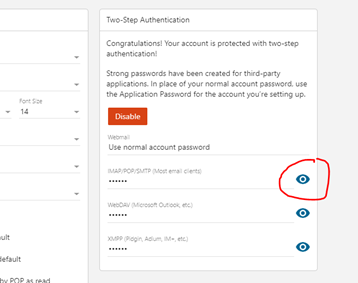
This is the password you use to connect your mobile or tablet to your email. Yours will be a unique password.
Useful tip
When your mobile or tablet is disconnected from your email account, the mail program will generally pop up and ask you for the password. Enter this new password there and you will be reconnected.
If your device is not asking for the new password, go into settings and your mail settings and enter it manually there. This will the reconnect your device to your email service and it will be secure.
--------------------------------------------<END OF DOCUMENT> --------------------------------------------
|
Need help? Get in touch! |
|
You can call us on 01752 373000, option 2 or, if you are on Number Club, just call extension 3001 You can email us at hub@safeharboursupport.com You can Whatsapp us right here: https://wa.me/441752373000 |
|
|
65.027 How to configure SmarterMail on Android Mail app using IMAP
Docs |
Document Control
|
Document Name |
65.027 How to configure SmarterMail on Android using IMAP |
||
|
Version |
v1.0 Current |
||
|
Author |
Neil Tancock, IT Services (Safeharbour Support Ltd), neil@safeharboursupport.com |
||
|
Approval |
Safeharbour Support |
||
|
Approval date |
01-JAN-2025 |
Review date |
31-DEC-2027 |
|
Absract |
SmarterMail users can sync their email to their Android Mail app by configuring an IMAP account. With an IMAP account, you will create a two-way sync between SmarterMail and the device, where all emails folders are synced. This means that when you log into the SmarterMail Web interface, actions you performed within the Mail app on your iPhone or iPad will automatically appear in the Web interface, and vice versa. |
||
|
Scope |
This document applies to all clients of Safeharbour Support Ltd |
||
|
Inputs |
None |
||
|
Outputs |
None |
||
Change Control
|
Date |
Author |
Version |
Change |
|
02-DEC-2024 |
Neil Tancock |
0.0 |
First version |
|
01-JAN-2025 |
Neil Tancock |
1.0 |
Approved |
--------------------------------------------<START OF DOCUMENT> --------------------------------------------
Follow these steps to configure a SmarterMail IMAP connection on an Andriod device
Note: We will have sent you your email hostname, username and password in a welcome email. Please have that to hand before starting this procedure. If you don't have it please contact us and we will re-send it to you.
- Open your Android E-Mail applications
- Select My Accounts
- Select Add account
- Select Email
- Select OK
- Enter an account name (can be anything)
- Enter your name and e-mail address.
- Click OK
- If you see an option at the bottom for Manual Setup then click on it.
- For incoming Mail Server Select IMAP mail server.
- Server: Your mail server hostname
- Port: 993
- Username: Enter your FULL email address (i.e. myname@mydomain.com)
- Password: Enter your e-mail account password
- Make certain you leave SSL checked
- Click OK.
- For outgoing Mail Server SMTP server set Your mail server hostname
- Port: 465
- Username: Enter your FULL email address (IE:: myname@mydomain.com)
- Password: Enter your e-mail account password
- Make certain you leave SSL checked
- Make certain LOGIN REQUIRED is selected
- Click OK
- Your IMAP Android e-mail account is now complete
--------------------------------------------<END OF DOCUMENT> --------------------------------------------
|
Need help? Get in touch! |
|
You can call us on 01752 373000, option 2 or, if you are on Number Club, just call extension 3001 You can email us at hub@safeharboursupport.com You can Whatsapp us right here: https://wa.me/441752373000 |
|
|
65.028 How to configure SmarterMail on your Android device using Exchange
Docs |
Document Control
|
Document Name |
65.028 How to configure SmarterMail on your Android device using Exchange |
||
|
Version |
v1.0 Current |
||
|
Author |
Neil Tancock, IT Services (Safeharbour Support Ltd), neil@safeharboursupport.com |
||
|
Approval |
Safeharbour Support |
||
|
Approval date |
01-JAN-2025 |
Review date |
31-DEC-2027 |
|
Absract |
SmarterMail users can syncronise their email, calendar and contacts between their SmarterMail account and their Android device(s) by configuring an Exchange ActiveSync account. Unlike other synchronisation methods, Exchange ActiveSync uses direct push technology to sync email, calendars, and contacts to your iPhone or iPad in real time. |
||
|
Scope |
This document applies to all clients of Safeharbour Support Ltd |
||
|
Inputs |
None |
||
|
Outputs |
None |
||
Change Control
|
Date |
Author |
Version |
Change |
|
02-DEC-2024 |
Neil Tancock |
0.0 |
First version |
|
01-JAN-2025 |
Neil Tancock |
1.0 |
Approved |
--------------------------------------------<START OF DOCUMENT> --------------------------------------------
SmarterMail users can syncronise their email, calendar and contacts between their SmarterMail account and their Android device(s) by configuring an Exchange ActiveSync account. Unlike other synchronisation methods, Exchange ActiveSync uses direct push technology to sync email, calendars, and contacts to your iPhone or iPad in real time.
With an Exchange ActiveSync connection, you will create a two-way sync between SmarterMail and your device, where all emails, calendar entries and contacts are synced. This means that when you log into the SmarterMail Web interface, actions you performed on your Android device(s) will automatically appear in the Web interface, and vice versa. Exchange ActiveSync is also know by the abbreviation EAS.
|
Note: You must be set up as and Exchange ActiveSync user to connect using this method. If you are not set up as an Exchage ActiveSync user please contact us to request it. We will have sent you your email hostname, username and password in a welcome email. Please have that to hand before starting this procedure. If you don't have it please contact Hello Comtec and we will re-send it to you. |
Follow these steps to configure your iPhone or iPad to connect to SMarterMail using EAS
- On your Android device, open the Settings.
- Tap Cloud and Accounts. Then tap on Accounts.
- Tap Add Account. A list of applications will load.
- Tap on Microsoft Exchange ActiveSync.
- Complete the following required fields:
- Email address (your full email address)
- Password
- Tap Sign In.
- On the next screen, verify the Exchange Server Settings. Complete the following fields:
- Email address
- Domain\username (enter your full email address. ex: username@domain.com)
- Password
- Exchange Server (the URL to your webmail. For example, mail.example.com. NOTE: Do not include http:// when entering the server information.
- If your webmail does not support SSL, disable Use secure connection (SSL).
- Tap Sign In. The phone will attempt to verify the connection.
- Tap OK to allow remote control of security features on the device.
- On the Manual Setup screen, adjust some common settings for the period to sync email, sync schedule, email retrieval size, etc. and choose whether to sync Contacts, Calendar, and Tasks.
- Tap Next.
- Tap Activate on the Device Administrator screen to agree to the remote security control.
- On the last screen, add in the Account name that will be displayed in your Email, Contacts and Calendar apps.
- Tap Done to initiate the first sync
--------------------------------------------<END OF DOCUMENT> --------------------------------------------
|
Need help? Get in touch! |
|
You can call us on 01752 373000, option 2 or, if you are on Number Club, just call extension 3001 You can email us at hub@safeharboursupport.com You can Whatsapp us right here: https://wa.me/441752373000 |
|
|
65.029 How to configure SmarterMail on Outlook using Exchange
Docs |
Document Control
|
Document Name |
65.029 How to configure SmarterMail on Outlook using Exchange |
||
|
Version |
v1.0 Current |
||
|
Author |
Neil Tancock, IT Services (Safeharbour Support Ltd), neil@safeharboursupport.com |
||
|
Approval |
Safeharbour Support |
||
|
Approval date |
01-JAN-2025 |
Review date |
31-DEC-2027 |
|
Absract |
SmarterMail users can sync their email to the iPhone or iPad's Mail app by configuring an IMAP account. With an IMAP account, you will create a two-way sync between SmarterMail and the device, where all emails folders are synced. This means that when you log into the SmarterMail Web interface, actions you performed within the Mail app on your iPhone or iPad will automatically appear in the Web interface, and vice versa. |
||
|
Scope |
This document applies to all clients of Safeharbour Support Ltd |
||
|
Inputs |
None |
||
|
Outputs |
None |
||
Change Control
|
Date |
Author |
Version |
Change |
|
02-DEC-2024 |
Neil Tancock |
0.0 |
First version |
|
01-JAN-2025 |
Neil Tancock |
1.0 |
Approved |
--------------------------------------------<START OF DOCUMENT> --------------------------------------------
SmarterMail users can sync their email to the iPhone or iPad's Mail app by configuring an IMAP account. With an IMAP account, you will create a two-way sync between SmarterMail and the device, where all emails folders are synced. This means that when you log into the SmarterMail Web interface, actions you performed within the Mail app on your iPhone or iPad will automatically appear in the Web interface, and vice versa.
Follow these steps to configure a SmarterMail IMAP connection on your Outlook program
Note: We will have sent you your email hostname, username and password in a welcome email. Please have that to hand before starting this procedure. If you don't have it please contact Hello Comtec and we will re-send it to you.
- Open Outlook.
- Either use the default Profile Outlook gives you (named, appropriately enough, "Outlook") or create a new Profile for this account.
- If you want, you can choose to have Outlook prompt you for a specific profile when it opens, or you can set Outlook to always open a specific Profile -- it's your choice.
- Enter the full email address you want to set up.
- Click the Next button.
- You may be presented with an Advanced Setup modal -- select Exchange from the list of options if you are. (Office 365 may be selected by default -- BE SURE to change that select to Exchange to set up a MAPI connection to SmarterMail.)
- If you are prompted with a certificate warning, click the Yes button to accept the certificate. (This will generally only occur if you haven't accepted a connection that uses the same SSL certificate before.)
- During the set up process, you'll see a Windows Security modal that asks for a password -- input your mail account password and check the box to "Remember my credentials". Checking this box saves your credentials in Windows Credential manager.
- Click the OK button.
- After you input your password, Outlook will ask you to set your sync settings. This, essentially, is telling Outlook how far back to go to sync your account. By default, 1 year is selected, which is a good place to start. If you have a large mailbox -- say, 5GB or more -- you may want to limit the sync to 6 months or less, if possible. Regardless, you can always change this in Account Settings once the account is set up.
- Click the Next button.
- You will automatically have the account set up in Outlook, and should see the following window:
- Clicking the Done button will open Outlook -- if you have Outlook set to select a Profile each time you open it, you'll have to select your newly-created Profile from the dropdown menu. Otherwise, Outlook should open and start syncing to your SmarterMail account.
If you're running something like Fiddler when you're trying to connect your account, you'll notice that, regardless of the domain being used, Microsoft pings it's own systems first before moving on to any autodiscover or other DNS lookups during the account set up process. If it finds your domain in its cache, it assumes you're trying to connect to Office365, so it prompts you for your Office365 login credentials. (This opens in a small browser window whereas the Windows Security modal is an actual system modal.) To get around this, you can try one of the following:
- Simply click the X in the Office365 login modal -- this should cancel that login attempt, prompting Outlook to do a normal autodiscover lookup for the domain. If that does NOT work,
- Cancel the set up and restart the process, but this time try setting up the account manually, avoiding any autodiscover lookups.
--------------------------------------------<END OF DOCUMENT> --------------------------------------------
|
Need help? Get in touch! |
|
You can call us on 01752 373000, option 2 or, if you are on Number Club, just call extension 3001 You can email us at hub@safeharboursupport.com You can Whatsapp us right here: https://wa.me/441752373000 |
|
|
65.030 How to configure SmarterMail on Outlook using IMAP
Docs |
Document Control
|
Document Name |
65.030 How to configure SmarterMail on Outlook using IMAP |
||
|
Version |
v1.0 Current |
||
|
Author |
Neil Tancock, IT Services (Safeharbour Support Ltd), neil@safeharboursupport.com |
||
|
Approval |
Safeharbour Support |
||
|
Approval date |
01-JAN-2025 |
Review date |
31-DEC-2027 |
|
Absract |
SmarterMail users can sync their email to the iPhone or iPad's Mail app by configuring an IMAP account. With an IMAP account, you will create a two-way sync between SmarterMail and the device, where all emails folders are synced. This means that when you log into the SmarterMail Web interface, actions you performed within the Mail app on your iPhone or iPad will automatically appear in the Web interface, and vice versa. |
||
|
Scope |
This document applies to all clients of Safeharbour Support Ltd |
||
|
Inputs |
None |
||
|
Outputs |
None |
||
Change Control
|
Date |
Author |
Version |
Change |
|
02-DEC-2024 |
Neil Tancock |
0.0 |
First version |
|
01-JAN-2025 |
Neil Tancock |
1.0 |
Approved |
--------------------------------------------<START OF DOCUMENT> --------------------------------------------
SmarterMail users can sync their email to the iPhone or iPad's Mail app by configuring an IMAP account. With an IMAP account, you will create a two-way sync between SmarterMail and the device, where all emails folders are synced. This means that when you log into the SmarterMail Web interface, actions you performed within the Mail app on your iPhone or iPad will automatically appear in the Web interface, and vice versa.
Follow these steps to configure a SmarterMail IMAP connection on your Outlook program
Note: We will have sent you your email hostname, username and password in a welcome email. Please have that to hand before starting this procedure. If you don't have it please contact Hello Comtec and we will re-send it to you.
- In Outlook, go to File, Click the Info tab
- Click Add Account
- Click Manually configure server settings or additional server types radio button.
- Click Next.
- Click the Internet Email radio button.
- Click Next
- Enter the following information:
- Your Name: <Display Name you want to use, i.e., Joe Smith>
- Email address: <Full email address, i.e., username@domainname.com>
- Incoming Server: <your email server>
- Outgoing Mail server: <your email server>
- User name: <Full email address, i.e., username@domainname.com>
- Password: <Your email account password>
- Configure Authentication
- Configure SSL Port - Click on More Settings.
- Navigate to Outgoing Server Tab
- Check "My Outgoing Server requires SMTP Authentication".
- Click OK.
- Click on More Settings
- Click on Advanced
- Check "This server requires an encrypted connection (SSL)" and the Port should change to 993. If not, set it to 993.
- For SMTP, where is says "Use the following type of encrypted connection", select SSL
- Change the Outgoing SMTP server Port to 465
- Click OK.
--------------------------------------------<END OF DOCUMENT> --------------------------------------------
|
Need help? Get in touch! |
|
You can call us on 01752 373000, option 2 or, if you are on Number Club, just call extension 3001 You can email us at hub@safeharboursupport.com You can Whatsapp us right here: https://wa.me/441752373000 |
|
|
65.031 How to configure SmarterMail on iPhone or iPad using IMAP
Docs |
Document Control
|
Document Name |
65.031 How to configure SmarterMail on iPhone or iPad using IMAP |
||
|
Version |
v1.0 Current |
||
|
Author |
Neil Tancock, IT Services (Safeharbour Support Ltd), neil@safeharboursupport.com |
||
|
Approval |
Safeharbour Support |
||
|
Approval date |
01-JAN-2025 |
Review date |
31-DEC-2027 |
|
Absract |
SmarterMail users can sync their email to the iPhone or iPad's Mail app by configuring an IMAP account. With an IMAP account, you will create a two-way sync between SmarterMail and the device, where all emails folders are synced. This means that when you log into the SmarterMail Web interface, actions you performed within the Mail app on your iPhone or iPad will automatically appear in the Web interface, and vice versa. |
||
|
Scope |
This document applies to all clients of Safeharbour Support Ltd |
||
|
Inputs |
None |
||
|
Outputs |
None |
||
Change Control
|
Date |
Author |
Version |
Change |
|
02-DEC-2024 |
Neil Tancock |
0.0 |
First version |
|
01-JAN-2025 |
Neil Tancock |
1.0 |
Approved |
--------------------------------------------<START OF DOCUMENT> --------------------------------------------
SmarterMail users can sync their email to the iPhone or iPad's Mail app by configuring an IMAP account. With an IMAP account, you will create a two-way sync between SmarterMail and the device, where all emails folders are synced. This means that when you log into the SmarterMail Web interface, actions you performed within the Mail app on your iPhone or iPad will automatically appear in the Web interface, and vice versa.
Follow these steps to configure a SmarterMail IMAP connection on an iPhone or iPad:
Note: We will have sent you your email hostname, username and password in a welcome email. Please have that to hand before starting this procedure. If you don't have it please contact Hello Comtec and we will re-send it to you.
- On your iPhone or iPad, go to Settings > Accounts & Passwords and tap Add Account. (If you're using iOS 10.3.3 or earlier, go to Settings > Mail > Accounts and tap Add Account.)
- Tap Other, then tap Add Mail Account.
- Enter your name, email address, password, and a description for your account. Tap Next. Mail will try to find the email settings and finish your account setup. If Mail finds your email settings, tap Done to complete your account setup.
- If Mail can't find your email settings, then you need to enter them manually. On the IMAP tab, enter the information for Incoming Mail Server and Outgoing Mail Server. Note that this is the information you'll need to retrieve from your email provider. If you're not sure who manages your SmarterMail account, contact the SmarterTools sales team for assistance. We may be able to determine who is hosting your SmarterMail account and point you in the right direction. You can also try the following setup:
- The Hostname is the same for the incoming and outgoing mail server, and it usually takes the form of mail.yourdomainname.com.
- For the Username, be sure to enter your full SmarterMail address.
- The Password is the same password used to access webmail.
- Then tap Next.
- If your email settings are correct, tap Save to finish. (If the email settings are incorrect, you'll be asked to edit them. To troubleshoot a failed connection, please contact us and we'll be happy to help you out.)
--------------------------------------------<END OF DOCUMENT> --------------------------------------------
|
Need help? Get in touch! |
|
You can call us on 01752 373000, option 2 or, if you are on Number Club, just call extension 3001 You can email us at hub@safeharboursupport.com You can Whatsapp us right here: https://wa.me/441752373000 |
|
|
65.047 How to configure SmarterMail on the Android Gmail app using IMAP
Docs |
Document Control
|
Document Name |
65.047 How to configure SmarterMail on the Android GMail using IMAP |
||
|
Version |
v1.1 Current |
||
|
Author |
Neil Tancock, IT Services (Safeharbour Support Ltd), neil@safeharboursupport.com |
||
|
Approval |
Safeharbour Support |
||
|
Approval date |
01-APR-2025 |
Review date |
31-MAR-2027 |
|
Absract |
SmarterMail users can sync their email to their Android GMail app by configuring an IMAP account. With an IMAP account, you will create a two-way sync between SmarterMail and the device, where all emails folders are synced. This means that when you log into the SmarterMail Web interface, actions you performed within the Mail app on your iPhone or iPad will automatically appear in the Web interface, and vice versa. |
||
|
Scope |
This document applies to all clients of Safeharbour Support Ltd |
||
|
Inputs |
None |
||
|
Outputs |
None |
||
Change Control
|
Date |
Author |
Version |
Change |
|
01-APR-2025 |
Neil Tancock |
0.0 |
First version |
|
01-APR-2025 |
Neil Tancock |
1.0 |
Approved |
--------------------------------------------<START OF DOCUMENT> --------------------------------------------
Follow these steps to configure a SmarterMail IMAP connection on an Andriod device
Note: We will have sent you your email hostname, username and password in a welcome email. Please have that to hand before starting this procedure. If you don't have it, please contact us and we will re-send it to you.
|
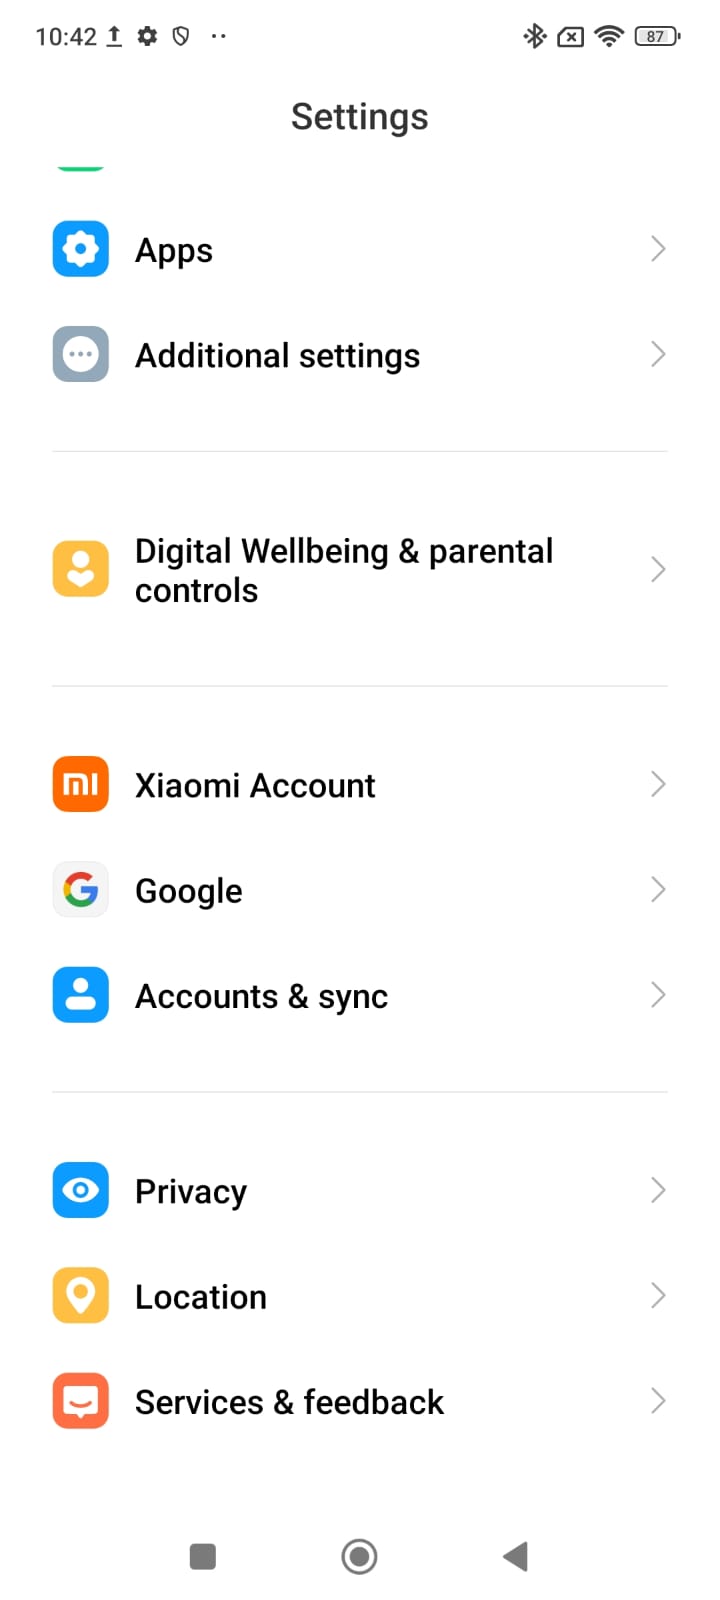
1. Open your Settings on your phone:
|
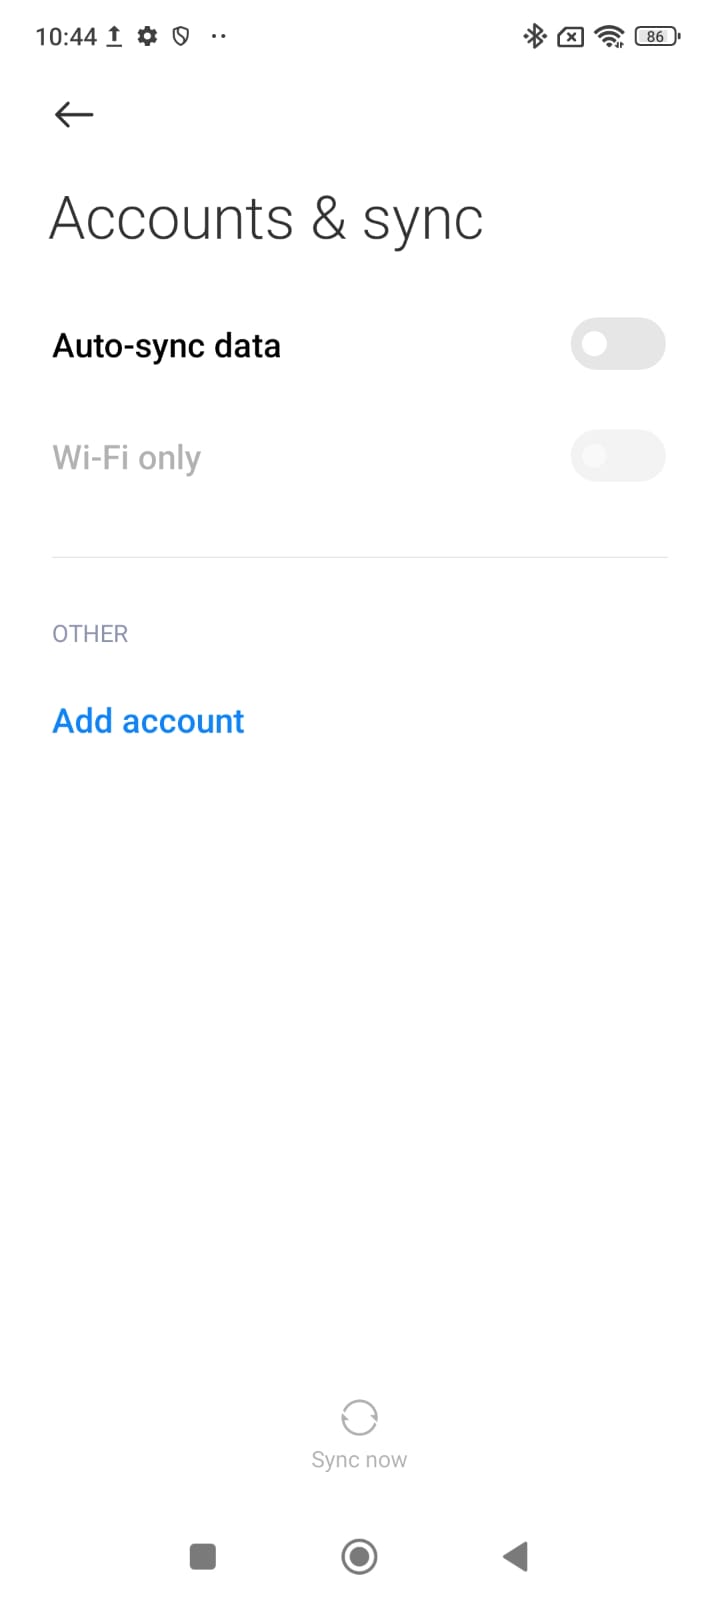
2. Scroll down and click Accounts & sync:
|
| 3. Click on Add account:
|
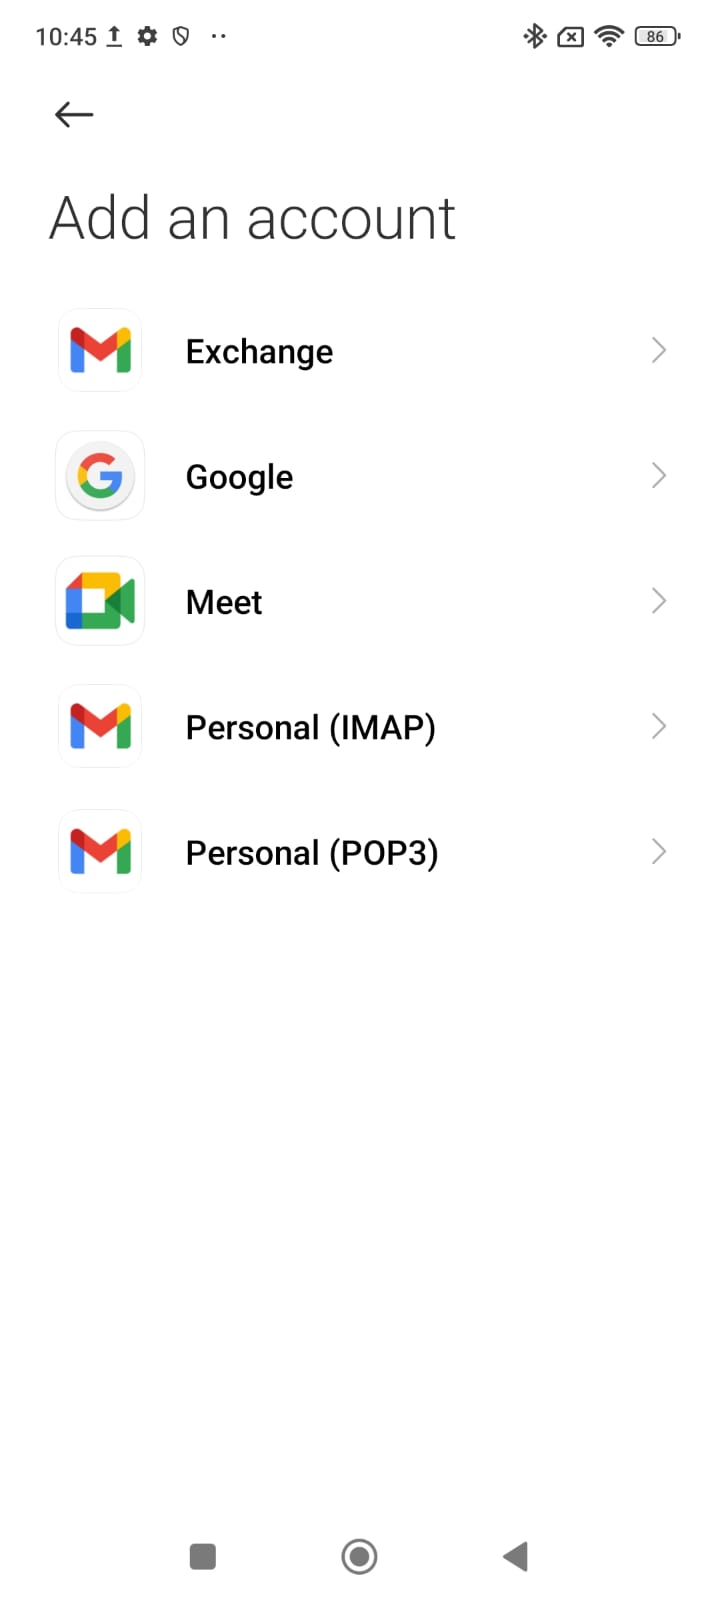
4. Click on Personal (IMAP)
|
|
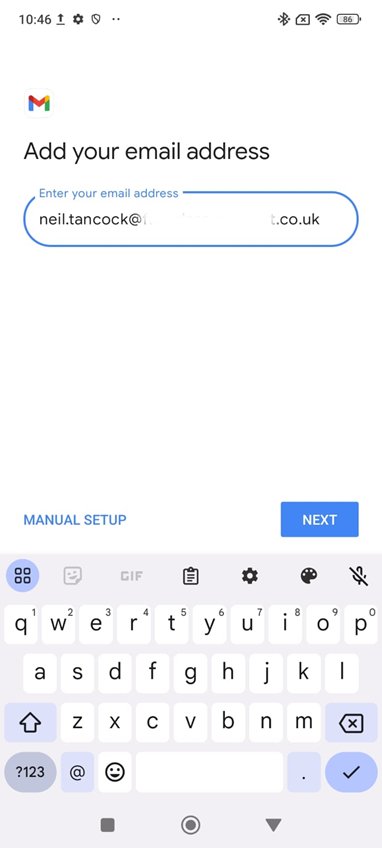
5. Add your email address and click [Next]:
|
6. Enter your password and click [Next]: |
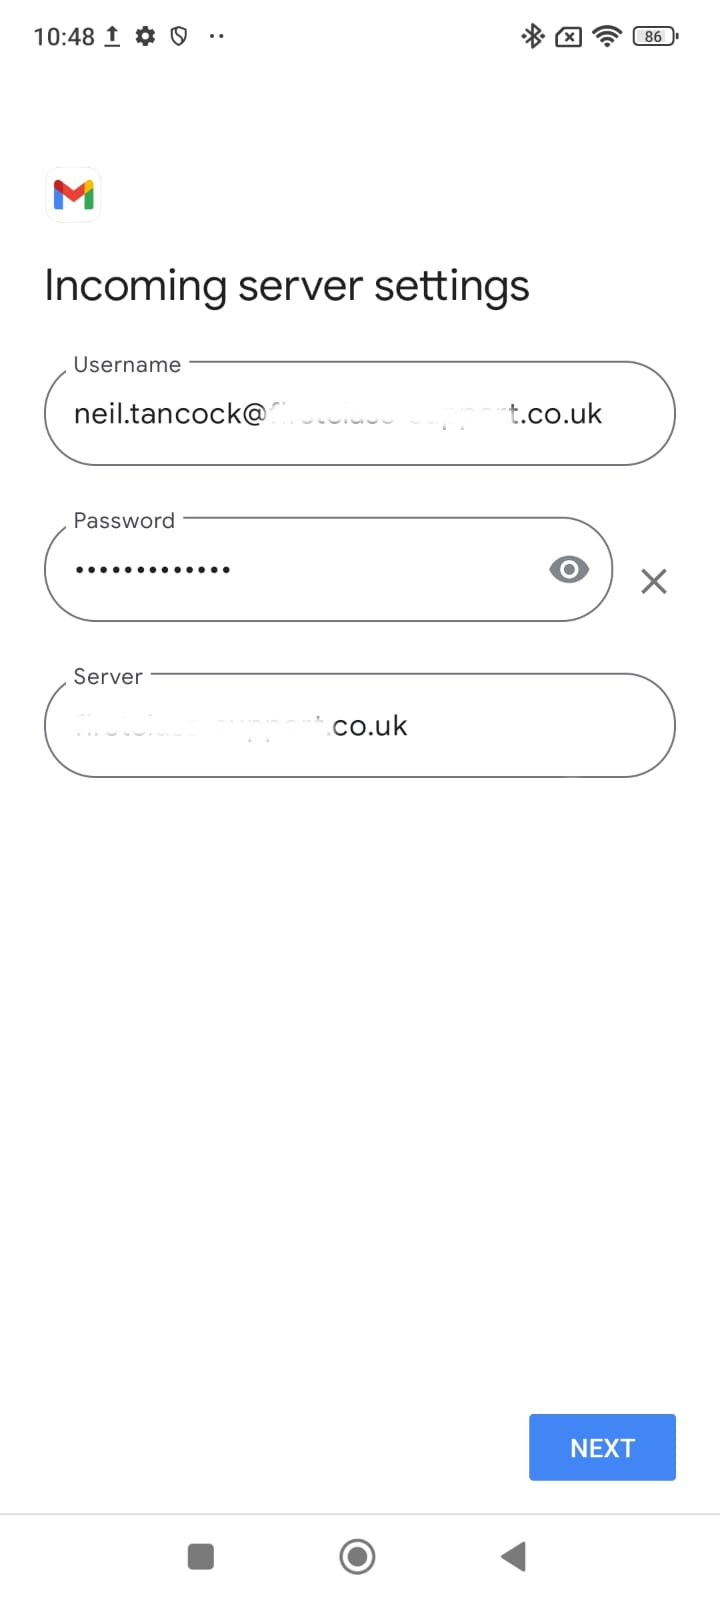
| 7. On Incoming server settings, change the Server to mail.firstclass-support.co.uk and click [Next]
|
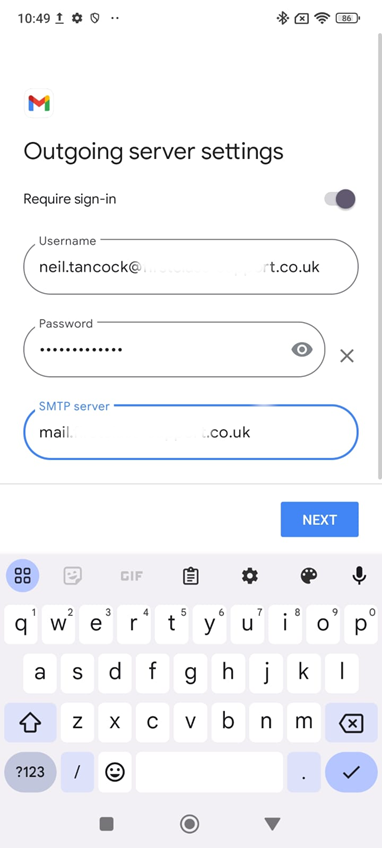
8. On Outgoing server settings, change the SMTP Server to mail.firstclass-support.co.uk and click [Next]:
|
|
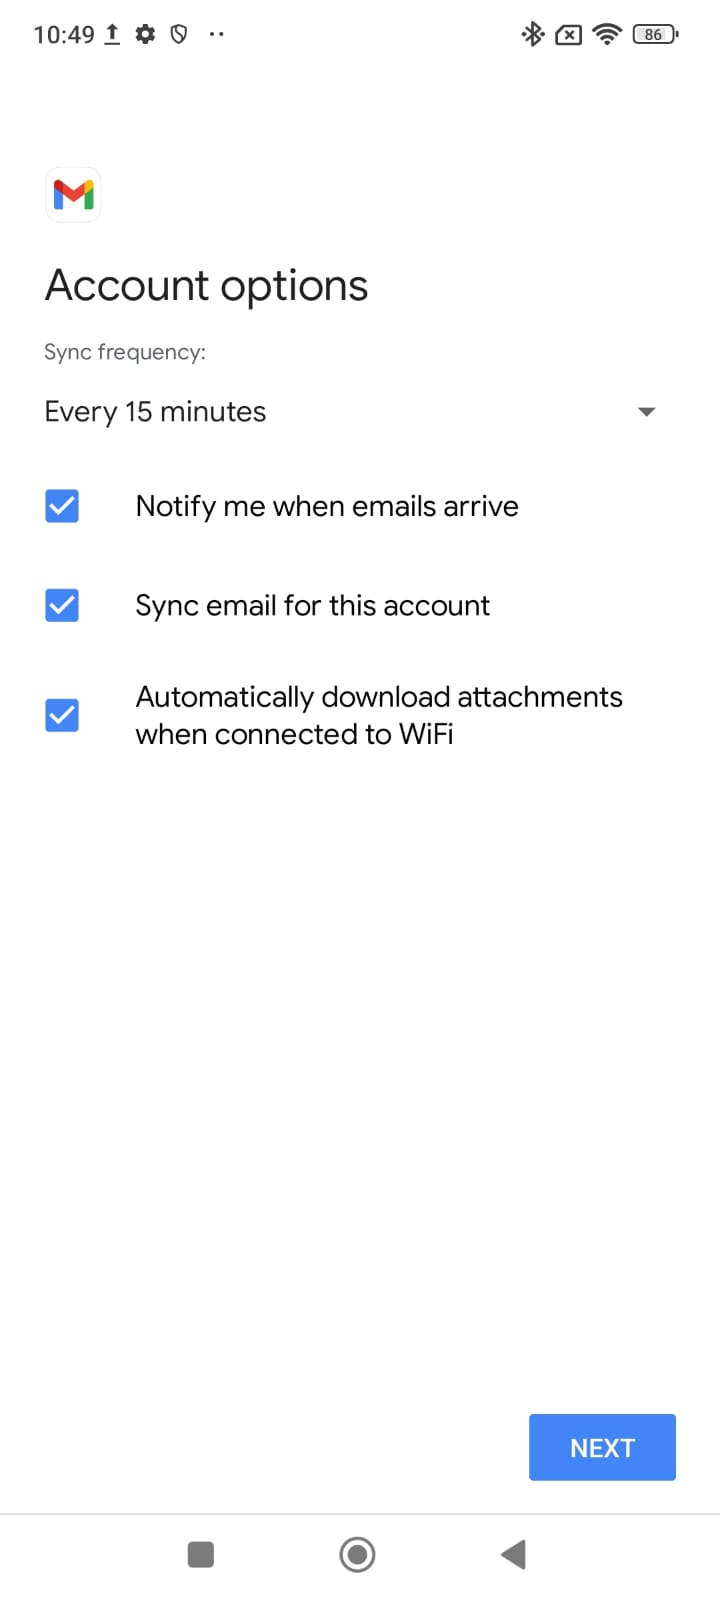
9. On Account options, change nothing and click [Next]:
|
10. That's it - your emails are now in your Gmail app: |

--------------------------------------------<END OF DOCUMENT> --------------------------------------------
|
Need help? Get in touch! |
|
You can call us on 01752 373000, option 2 or, if you are on Number Club, just call extension 3001 You can email us at hub@safeharboursupport.com You can Whatsapp us right here: https://wa.me/441752373000 |
|
|