1. On your Android device, open the **Settings.**
2. Tap **Cloud and Accounts**. Then tap on **Accounts**.
3. Tap **Add Account**. A list of applications will load.
4. Tap on **Microsoft** **Exchange ActiveSync**.
5. Complete the following required fields:
- Email address (your full email address)
- Password
6. Tap **Sign In**.
7. On the next screen, verify the Exchange Server Settings. Complete the following fields:
- Email address
- Domain\\username (enter your full email address. ex: username@domain.com)
- Password
- Exchange Server (the URL to your webmail. For example, mail.example.com. NOTE: Do not include http:// when entering the server information.
- If your webmail does not support SSL, disable **Use secure connection (SSL)**.
8. Tap **Sign In**. The phone will attempt to verify the connection.
9. Tap **OK** to allow remote control of security features on the device.
10. On the Manual Setup screen, adjust some common settings for the period to sync email, sync schedule, email retrieval size, etc. and choose whether to sync Contacts, Calendar, and Tasks.
11. Tap **Next**.
12. Tap **Activate** on the Device Administrator screen to agree to the remote security control.
13. On the last screen, add in the **Account name** that will be displayed in your Email, Contacts and Calendar apps.
14. Tap **Done** to initiate the first sync
1. Open Outlook.
2. Either use the default Profile Outlook gives you (named, appropriately enough, "Outlook") or create a new Profile for this account.
1. If you want, you can choose to have Outlook prompt you for a specific profile when it opens, or you can set Outlook to always open a specific Profile -- it's your choice.
3. Enter the full email address you want to set up.
4. Click the Next button.
5. You may be presented with an Advanced Setup modal -- select **Exchange** from the list of options if you are. (Office 365 may be selected by default -- BE SURE to change that select to Exchange to set up a MAPI connection to SmarterMail.)
6. If you are prompted with a certificate warning, click the **Yes** button to accept the certificate. (This will generally only occur if you haven't accepted a connection that uses the same SSL certificate before.)
7. During the set up process, you'll see a Windows Security modal that asks for a password -- input your mail account password and check the box to "***Remember my credentials***". Checking this box saves your credentials in Windows Credential manager.
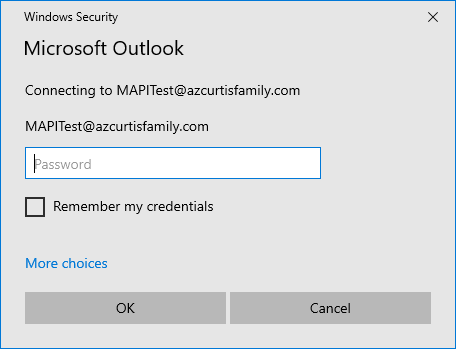
8. Click the **OK** button.
9. After you input your password, Outlook will ask you to set your sync settings. This, essentially, is telling Outlook how far back to go to sync your account. By default, 1 year is selected, which is a good place to start. If you have a large mailbox -- say, 5GB or more -- you may want to limit the sync to 6 months or less, if possible. Regardless, you can always change this in Account Settings once the account is set up.
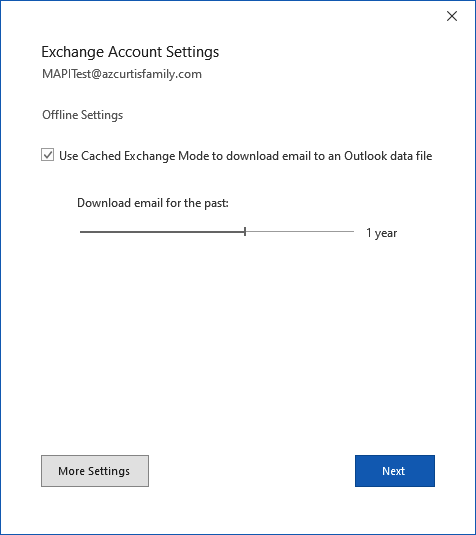
10. Click the **Next** button.
11. You will automatically have the account set up in Outlook, and should see the following window:
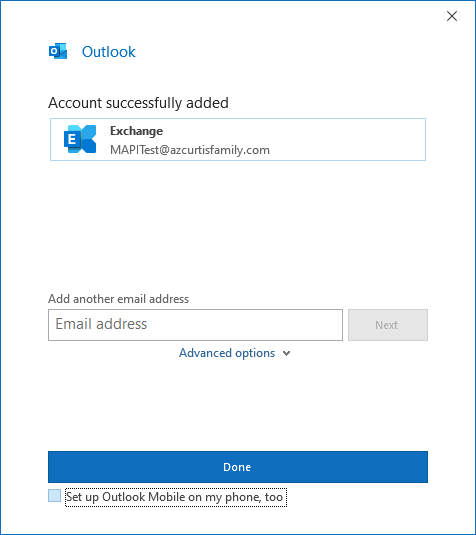
12. Clicking the **Done** button will open Outlook -- if you have Outlook set to select a Profile each time you open it, you'll have to select your newly-created Profile from the dropdown menu. Otherwise, Outlook should open and start syncing to your SmarterMail account.
**Troubleshooting**
MAPI integration with SmarterMail is not without potential issues. This is primarily due to how ingrained Outlook for Windows is in the Microsoft ecosystem, Office 365 in particular. We worked long and hard to try and avoid any possible roadblocks, but there are some that even Microsoft can't help resolve. So, below are some potential issues you may run into, and the steps we've found that can help work around those issues.
**When using autodiscover, I'm prompted with a Microsoft Office login window as opposed to a Windows Security modal**
This is probably because the domain you're using either was on Office365 in the past, but isn't now, or you're using Office365 for the online productivity suite, but not the Exchange portion. As such, Microsoft has cached the domain in its internal systems and is therefore defaulting to Office365 when doing its own lookups.
If you're running something like Fiddler when you're trying to connect your account, you'll notice that, regardless of the domain being used, Microsoft pings it's own systems first before moving on to any autodiscover or other DNS lookups during the account set up process. If it finds your domain in its cache, it assumes you're trying to connect to Office365, so it prompts you for your Office365 login credentials. (This opens in a small browser window whereas the Windows Security modal is an actual system modal.) To get around this, you can try one of the following:
1. Simply click the X in the Office365 login modal -- this should cancel that login attempt, prompting Outlook to do a normal autodiscover lookup for the domain. If that does NOT work,
2. Cancel the set up and restart the process, but this time try setting up the account manually, avoiding any autodiscover lookups.
1. In Outlook, go to File, Click the Info tab
2. Click **Add Account**
3. Click **Manually configure server settings or additional server types** radio button.
4. Click **Next**.
5. Click the **Internet Email** radio button.
6. Click **Next**
7. **Enter the following information:**
1. Your Name: <Display Name you want to use, i.e., Joe Smith>
2. Email address: <Full email address, i.e., username@domainname.com>
3. Incoming Server: <your email server>
4. Outgoing Mail server: <your email server>
5. User name: <Full email address, i.e., username@domainname.com>
6. Password: <Your email account password>
8. **Configure Authentication**
1. Configure SSL Port - Click on **More Settings.**
2. Navigate to **Outgoing Server** Tab
3. Check "My Outgoing Server requires SMTP Authentication".
4. Click **OK**.
5. Click on **More Settings**
6. Click on **Advanced**
7. Check "This server requires an encrypted connection (SSL)" and the Port should change to 993. If not, set it to 993.
8. For SMTP, where is says "Use the following type of encrypted connection", select SSL
9. Change the Outgoing SMTP server Port to 465
10. Click **OK**.