User Guides
- 65.041 Call Recording on Wildix
- 65.042 The Workforce handset
- Wildix App for iOS user guide
- Wildix Android Collaboration Mobile App
- Set Active Device on Wildix
- Wildix Feature Codes
65.041 Call Recording on Wildix
Docs |
Document Control
|
Document Name |
65.041 Call Recording on Wildix |
||
|
Version |
v1.0 Current |
||
|
Author |
Neil Tancock, IT Services (Safeharbour Support Ltd), neil@safeharboursupport.com |
||
|
Approval |
Safeharbour Support |
||
|
Approval date |
01-JAN-2025 |
Review date |
31-DEC-2027 |
|
Absract |
None |
||
|
Scope |
This document applies to all clients of Safeharbour Support Ltd |
||
|
Inputs |
None |
||
|
Outputs |
None |
||
Change Control
|
Date |
Author |
Version |
Change |
|
02-DEC-2024 |
Neil Tancock |
0.0 |
First version |
|
01-JAN-2025 |
Neil Tancock |
1.0 |
Approved |
--------------------------------------------<START OF DOCUMENT> --------------------------------------------
Summary
This how-to will help you use call recording on Wildix. Call recording can be used at any time during the call and the recording will be available in your call history in Collaboration once the call is complete.
Procedure - using a desk phone
- To switch on call recording, dial *1 on your phone's keypad. You will hear a beep and the call will start being recorded from that point. The other party will not hear the beep.
- When you wish to stop recording, you can dial *1 again or simply hang up if the call is complete.
- The recording will be emailed to you as an attachment and also appear in your Call History in Collaboration. You will see a sound file icon next to the call. Click the icon to download the recording as an MP3 file:


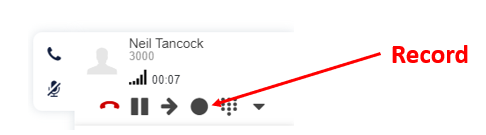
Procedure - using Collaboration
- To switch on call recording, click the record button on the current call tab:

- You will hear a beep and the record button will light up. The call will start being recorded from that point. The other party will not hear the beep.
- When you wish to stop recording, you click the record button again or simply hang up if the call is complete.
- The recording will be emailed to you as an attachment and also appear in your Call History in Collaboration. You will see a sound file icon next to the call. Click the icon to download the recording as an MP3 file:
<END OF DOCUMENT>
--------------------------------------------<END OF DOCUMENT> --------------------------------------------
|
Need help? Get in touch! |
|
You can call us on 01752 373000, option 2 or, if you are on Number Club, just call extension 3001 You can email us at hub@safeharboursupport.com You can Whatsapp us right here: https://wa.me/441752373000 |
|
|
65.042 The Workforce handset
Docs |
Document Control
|
Document Name |
65.042 The Workforce handset |
||
|
Version |
v1.0 Current |
||
|
Author |
Neil Tancock, IT Services (Safeharbour Support Ltd), neil@safeharboursupport.com |
||
|
Approval |
Safeharbour Support |
||
|
Approval date |
01-JAN-2025 |
Review date |
31-DEC-2027 |
|
Absract |
None |
||
|
Scope |
This document applies to all clients of Safeharbour Support Ltd |
||
|
Inputs |
None |
||
|
Outputs |
None |
||
Change Control
|
Date |
Author |
Version |
Change |
|
02-DEC-2024 |
Neil Tancock |
0.0 |
First version |
|
01-JAN-2025 |
Neil Tancock |
1.0 |
Approved |
--------------------------------------------<START OF DOCUMENT> --------------------------------------------
Workforce User Guide

Call Management
Placing a Call
Lift the handset, dial the number and press the send softkey, or press the speaker key

without lifting the receiver.
If placing a call using a headset ensure the the speaker key has been pressed, then follow the steps above.
Call from Phonebook:
-
-
- Press Phoneb Softkey or Phonebook key.
- Press Filter Softkey and select a phonebook.
- Press Search Softkey then type the name / number.
- Press Enter Softkey to confirm.
- Press Dial Softkey.
-
Call from History:
-
-
- Press History Softkey.
- Select a colleague from the list.
- Press Dial Softkey
- Lift the handset.
-
Call via BLF Keys.
-
-
- Lift the handset.
- Press a BLF key assigned to a colleague / group you would like to call.
-
Answering Incoming Calls
To answer an incoming call lift the receiver, or press the Answer Softkey, or the speaker key
 .
.
Muting the Ring of an Incoming Call Without Answering.
Press Silence Softkey.
Decline a Call
Press Reject Softkey.
Holding Calls
To place a call on hold press the Hold softkey during an active call, to return to the call press the Resume softkey.
If you have several calls on hold: use Navigation keys to select the call, then press Resume
Make a second call: press New Softkey, dial a number or press Select Softkey to search for a contact in History or in Phonebook.
Call Transfer (Blind)
-
-
- Whilst on an active call press the call transfer key
to place the call on hold.
- Dial the extension / external number required
- To transfer the call replace the receiver on hook, or press the speaker key.

- Whilst on an active call press the call transfer key
-

Call transfer (Announced)
-
-
- Whilst on an active call press the call transfer key to place the call on hold.
- Dial the extension / external number required.
- On answer announce the call and replace the receiver or press the speaker key to complete the transfer.
- Whilst on an active call press the call transfer key
-
Conference Call
-
-
- Whilst on an active call press the New softkey to place the call on hold.
- Make a second call to the contact you wish to invite to the conference call.
- On answer press the Conf softkey to enter the party into the conference.
-
Press Split Softkey to split the two calls or hang up to end the conference.
Recording a call
Press *1 during a call to start / stop call recording.
Note: Only users with certain permissions can record calls.
Pick up a ringing call / see who is calling
Press a BLF key "Colleague" / "Call group" assigned to a colleague or a call group who is receiving an incoming call.
Note: Only users with certain permissions can see who is calling other users.
You see who is calling and receive an audio notification when there is an incoming call:
See who is calling: View calls (eye icon) option must be enabled in Collaboration for this function key.
Get audio notification when there is an incoming call: Audio notification (speakerphone icon) option must be enabled in Collaboration for this function key.
Ending Calls
To end an active call replace the receiver on the rest, if on speaker / headset press the speaker key
, or press the Hangup softkey.
Voicemail
To access your voicemail press the voicemail key

You may be prompted to enter the first 5 characters of your password.
Presence status monitoring.
Presence statuses of colleagues can be monitored directly via BLF keys. (Essential license or higher required)
The following colleagues statuses can be monitored:
-
-
- "available" (green circle icon)
- "away" (clock icon)
- "dnd" (brick icon)
-
Note: if a colleague does not have a registered device, no icon is displayed.
You can also monitor full presence status of users in Phonebook (available only for users with Essential license or higher):
-
-
- Press Phoneb Softkey or Phonebook key.
- Press Filter Softkey and select a phonebook.
- Press Search Softkey then type the name / number.
- Press Enter Softkey to confirm.
- Press Phoneb Softkey or Phonebook key.
-
It is also possible to monitor the following colleague statuses via Phonebook:
-
-
- "available" (green circle icon)
- "offline" (no icon)
- "busy" (handset icon)
- "incoming" (arrow icon)
- "away" (clock icon)
- "dnd" (brick icon)
-
BLF keys.
16 BLF keys (2 pages) for Workforce handsets (use Navigation keys to move between the pages)
Call features.
Press Featur. Softkey from the standby mode to access the menu. This menu allows you to change call features for each type of call (Internal / External / Whitelist / Blacklist (available / DND / away):
Note: call features are synched between all devices of a user and can also be set from Collaboration / WMS / Vision / Supervision / iOS / Android app.
-
-
- Status: Available / DND / Away
-
Note: all features below are applied only for the selected user status.
-
-
-
- Until (only for DND / Away): Time / Date - set expiry time and date for DND / Away user status
- Activate (only for DND / Away): On / Off - when disabled, call features for DND / Away status's cannot be changed.
-
-
-
-
- Call type: Internal / External / Blacklist / Whitelist
-
Note: all the features below are applied only for the selected call class.
-
-
-
- Call reject: On / Off - if enabled, all calls are rejected.
- Call forwarding - call forwarding settings
- forced: On / Off - enable / disable forwarding of all calls
-
-
Note: When Call forwarding is activated for all calls for internal or external call class, CFN label (Call Forwarding Numner) indicating the destination (extension number / Voicemail) and the arrow icon is displayed on the screen; in case call forwarding of both internal and external call class is activated, call forwarding number for internal calls is displated on the screen.
You can set the destination for each type of call forwarding: enter the phone number or the value VOICEMAIL.
-
-
- Call waiting: On / Off - enable call waiting to be able to receive more than one call at a time.
- Mobile: On / Off - if enabled, after a timeout, incoming calls are routed also to your Mobile extension number: phone number and timeout can be specified in Collaboration Settings.
- Ring Tone: select the ringtone.
-
Phone Settings
To access Phone settings , press Menu softkey from idle:
-
-
- Status: view IP, Mac, Firmware of your phone.
- Backlight settings: set the backlight level of the screen and select the timeout (min - 20 sec, max - 1 hour or always On) after which the phone's screen should turn off.
-
- Audio settings: adjust Talk, Tone, Mic, Key, Ring volume.
- Headset Ring Mode: allows you to decide whether ringtone should be played via Headset or via Handsfree when a Headset is connected.
- Handsfree: sound input: allows you to select the active microphone in handsfree mode when the handset is lifted (either the handset's mic or the phone's mic)
- Network: access to this menu is recommended for the the PBX administrator.
- Autoprovision: access to the menu is recommended only for the administrator.
- Audio settings: adjust Talk, Tone, Mic, Key, Ring volume.
-
--------------------------------------------<END OF DOCUMENT> --------------------------------------------
|
Need help? Get in touch! |
|
You can call us on 01752 373000, option 2 or, if you are on Number Club, just call extension 3001 You can email us at hub@safeharboursupport.com You can Whatsapp us right here: https://wa.me/441752373000 |
|
|
Wildix App for iOS user guide
iOS Collaboration Mobile APP
Login
Launch the app:
-
-
-
- Domain: PBX IP or Domain name
-
-
Note: you can enter the PBX name, wildix.com is added automatically
-
-
-
- User name:Extension / User name / Email address
- Password: WEB password of a user for access to Collaboration
-
-
Or
You can use Google / Office 365 credentials for single sign-on.

Two - factor authentication (2FA)
To use 2FA authentification for login, enable the option in Collaboration -> Settings ->Personal
Menu description

-
-
- - Contacts
- - Call history
- - Dialpad / Function Keys / Active call
- - Chat
- - Settings
-
User status
-
-
-
- Tap Dialpad (3)
- Tap status icon / user picture
- Tap on the current status and select the new one: DND / Away / Offline / Online
- Enter your status message (optional)
- Tap the Tick icon to apply changes
- Tap Dialpad (3)
-
-

Note: for DND / Away an expiry time may be set via Until option (optional) after which your status goes to online
Note: offline status is available only for mobile apps and it allows you to disconnect from Presence and VoIP servers; you will not receive push notification.
Call
Live search
you can use real time search in PBX phonebooks to place calls.
Note: You can also sync your enterprise phonebooks if you want them to appear in Contacts menu of the Wildix Mobile Collaboration App.
Place a call from Dialpad
-
-
-
- Tap Dialpad
- Select the mode to place a call
-
-
Note: It is possible to generate a call via another device registered to your account (WP phone, Vision / SuperVision, W-AIR handset / etc)
-
-
-
- VoIP: place a call via the PBX (recommended where you have fast and reliable internet connection)
- Callback: you receive a callback from the PBX via the Mobile network (make sure your mobile number is indicated in Settings -> Personal)
- Direct Call: place a call via Mobile network
- Wildix devices registered to your account: select a device from the list - a call will be generated using the selected device
-
-
3. Start entering user's name or number / extension in the search field to find a user / a contact
4. Tap on a user / contact you wish to call. Select number / extension to place a call
Or
-
-
-
- Enter the number using Dialplan
- Tap the green Handset button
-
-
From Function keys
Note: Before using the feature, configure function keys (FK) in Collaboration -> Settings -> Function keys. Max. 20 function keys.
-
-
-
- Tap Dialpad and select Function keys to switch to Function keys menu
- Tap on a function key you wish to call
- Select Call from the drop-down list
-
-
From Enterprise contacts
Note: by default the local contacts from your device's phonebook appear in this menu
-
-
-
- Tap the contact number you wish to call
- Tap the number you wish to call
-
-
Note: a call is made using the mode selected in Dialpad menu (VoIP / Callback / Direct Call)
From History
-
-
-
- Go to History
- Tap on user
- A call is placed automatically
-
-
From Voicemail
-
-
-
- Go to Voicemail
- Tap on a voicemail message from a user you want to call
- Select Call from the drop-down list
-
-
From Chat
-
-
-
- Open a chat session with a user
- Tap the Handset button
- The call is placed automatically
-
-
From your device's contacts
-
-
-
- Tap a contact in your iOS contacts
- Tap and hold the Call button
- Select Collaboration
-
-

From a Browser (supporting URI for call generation)
Due to URI support a call can be initiated from a browser by clicking on a link containing a phone number. It allows calls to be placed from web pages.
Answer a call
Note: iOS mobile calls and VoIP calls have the same priority, VoIP calls will not be interrupted if you receive an incoming call.
-
-
-
- Tap the blue Tick button to answer
- Tap the red x button to decline
-
-
Call management
During a call you can navigate your device, open the App and tap Dialpad to come back to the active call.

-
-
- - Video
- - Hold
- Transfer select the required option from the list: Contact (choose a contact from Contacts / Number (dial a number you wish to call) / Device (select a device you wish to transfer the call to / Function key (select FK to transfer the call)
- - Record a call
- - Mute
- - Speakerphone. Tap to switch between audio sources: Speaker / Handset (iPhone) / Headphone
- - Conference
- - Hang up
- - DTMF
- - Switch back to Dialpad / Function keys tabs to make a call
-
Switch between audio sources
Note: If you paired Bluetooth headphones to your iPhone, they are automatically selected as an audio source during incoming / outgoing calls
If you have headphones connected to your iPhone you can switch to them during an active call
-
-
- Hold Speakerphone button for 2 seconds to display the list of available audio modes
- Select the needed mode from the list:
- iPhone (Handset)
- Speaker
- Headphones
-

Transfer
Blind transfer
(transfer without notification)
-
-
- Tap Transfer button during a call
- Tap Contact to select a number from the phonebook or manually enter a number
- Select a contact and tap the number / enter the number and tap the green Handset button
-
Attended transfer
(transfer with notification)
-
-
- Tap New call button during a call
- Make a new call (select a contact from Contacts or dial the number manually)
- Wait till the called party answers (the incoming call is placed on hold)
- Tap Transfer button and select the call on hold to complete the transfer
-
Transfer via Function keys
Transfer option via Function keys "Colleague", "Park Orbit" and "Speed dial" is available:
-
-
- Tap Dialpad and select Function keys to switch to Function keys menu
- Select the function key to transfer a call
- Tap Transfer for blind transfer, otherwise tap Call to start a call first (attended transfer)
-

Control of active calls on other devices and call continuity
Control of active calls on other devices
The feature allows you to view and control your own active calls on other devices registered to your account. You can hold / resume, record, hangup a call as well as send DTMF.
Call continuity
A call can be passed from other devices to iOS or other specific devices.
To pass an active call to iOS Collaboration app:
-
-
- Tap Call continuity button
- A call is automatically picked up on iOS
-
To pass an active call to a specific device:
-
-
- Tap and hold Call continuity button
- Select a device from the list
- A call is automatically picked on the selected device
-
 Chat (4)
All the colleagues added to your roster appear in Chat menu.
-
-
- Tap Chat
- Use the search field to find a user
- Tap a user and enter your message
- Tap the Paper plane icon to send the message
-
Note: To delete a chat session with a user, swipe it left.
Start a chat session from live search results
-
-
- Start entering user's name or number / extension in the search field to find a user
- Tap on a user you wish to chat. Select Chat from the list
-
Start a chat session from History
You can also start a chat session with a user from the History tab.
-
-
- Go to History (2)
- Select a user you would like to chat with and tap the double Arrowhead icon to view user contact details
- Tap Chat
- Go to History (2)
-
Note: If you delete a chat session with a user, you can restore it from History via Chat option.
Send a File / an Image / a Post-it / Call me back
Send a file / image
-
-
- Start a chat with a user
- Tap +
- Select the source : Camera / Photo & Video Library / Downloads
- Select files / images or take a photo using the camera to be sent (you can send up to 10 files / images)
- Tap Send button
- Confirm by tapping Send
-
Note: The maximum file size to be sent is 100Mb.

Send a Post-it
-
-
- Start a chat with a user
- Write your message
- Tap +
- Select the option Send as Post-it
-
Send call me back
-
-
- Start a chat with a user
- Tap +
- Select the option Call me back
-
Send a voice recording
-
-
- Start a chat with a user
- Press and hold the Microphone icon to record a message
- Release the button to send
-
Note: To cancel voice recording without sending, slide left.
Participate in Wizyconf videoconference
Important: for access to video conferencing service on iOS devices, ose Safari / Google Chrome browser or install Wizyconf iOS App
-
-
- Open a chat session with a user who sent an invitation
- Tap on the invitation
- Select Join to access the conference via Wizyconf iOS App or Call to access the conference in audio-mode.
- Tap Join to enter the conference:
- Upon the first access via the App, enter your name / conference ID.
- Once in the conference you are able to adjust settings by tapping the 3 dots icon: change camera / microphone source, enable low bandwidth mode, enter tile view
-
Current limitations:
-
-
- DND status "in conference" is removed after the conference is finished, but is not removed automatically after closing the tab with conference
- It is not possible to create a conference from the iOS app; it is possible to participate in the conference if you were invited (you receive an invitation via chat)
- It is not possible to join a conference with a different user using iOS Safari browserafter re-login in the app (user will join the conferenceas the previous user)
-
Multiuser group chat
Multiuser cloud-stored group chats enable up to 500 participants and send images / files
Limitations
-
-
-
- not available with PBXs with LifeTime licenses
- no more than 100 group chats can be received from the server
- if user opens a push notification from a group chat after being removed by the owner , one-to-one chat with the user who sent the message is opened
-
-
Create a group chat
-
-
- Tap +
- Edit the group title (optional)
- Add participants
- Tap Done to finish
-
Add / remove participants
Note: you cannot remove yourself and a group chat manager.
Open the group chat management section by tapping on its title
-
-
- To add a participant start typing a participant's name / number in the search field , tick to add
- to remove a participant untick a participant or tap on a participant with indicated x icon
- Tap Done to save changes
-
Leave / close the group chat
Only the group chat manager can close the chat. Other participants can leave it but can re-join only after the manager re-adds them
-
-
- Swipe the group chat left and tap Delete
-
History (2)
Note: Call history and missed calls notifications are synced over the PBX among all the devices registered to your account (except W-AIR handsets)
-
-
- Tap History to access the call logs. Incoming / outgoing / missed calls (highlighted in red) are displayed in All tab. To view only missed calls tap the Missed tab.
- Tab and hold a call to delete / archive or copy a number to the clipboard
- Tap the double Arrowhead icon to view user contact details and call log
-
Voicemails
Tap the Voicemail tab to access you voicemails.
-
-
- To download a voicemail message tap Arrow icon
- To play it back tap the Play button
- To pause a playback tap the Pause button
- Other options: tap on a voicemail message to display the drop-down list: Call a user who left a message, Mark as read or Delete it
-
Multi-edit of Voicemails:
-
-
- Select one or multiple Voicemails
- Click Mark as read or Delete icon
-
Call recordings
Call recordings are displayed and can be played back from History.
-
-
- To download a call recording tap the Arrow icon
- To play back a downloaded recording tap the Play button
- To pause a playback tap the Pause button
-
When there are multiple recordings of one call they are displayed in a list.
Change user picture
-
-
- Tap user picture to change the current profile photo
- Take a new photo or upload from existing photos
-
Log Out
-
-
- Tap Settings -> Account
- Tap the Log out icon
-

Wildix Android Collaboration Mobile App
Android Collaboration Mobile APP
Login
Launch the app:
-
-
-
- Domain: PBX IP or Domain name
-
-
Note: you can enter the PBX name, wildix.com is added automatically
-
-
-
- User name:Extension / User name / Email address
- Password: WEB password of a user for access to Collaboration
-
-
Or
You can use Google / Office 365 credentials for single sign-on.
Two - factor authentication (2FA)
To use 2FA authentification for login, enable the option in Collaboration -> Settings ->Personal
Menu description
-
-
- - Contacts
- - Call history
- - Dialpad / Function Keys / Active call
- - Chat
- - Settings
-
User status
-
-
-
- Tap Dialpad (3)
- Tap status icon / user picture
- Select user status: DND / Away / Offline / Online
- Enter your status message and select until date and time (optional)
- Tap the Tick icon to apply changes
- Tap Dialpad (3)
-
-

Note: for DND / Away an expiry time may be set via Until option (optional) after which your status goes to online
Note: offline status is available only for mobile apps and it allows you to disconnect from Presence and VoIP servers; you will not receive push notification.
Call
Live search
you can use real time search in PBX phonebooks to place calls.
Note: You can also sync your enterprise phonebooks if you want them to appear in Contacts menu of the Wildix Mobile Collaboration App.
Place a call from Dialpad
-
-
-
- Tap Dialpad
- Select the mode to place a call
-
-
Note: It is possible to generate a call via another device registered to your account (WP phone, Vision / SuperVision, W-AIR handset / etc)
-
-
-
- VoIP: place a call via the PBX (recommended where you have fast and reliable internet connection)
- Callback: you receive a callback from the PBX via the Mobile network (make sure your mobile number is indicated in Settings -> Personal)
- Direct Call: place a call via Mobile network
- Wildix devices registered to your account: select a device from the list - a call will be generated using the selected device
- Start entering user's name or number / extension in the search field to find a user / a contact
- Tap on a user / contact you wish to call. Select number / extension to place a call
-
-
Or
-
-
-
- Enter the number using Dialplan
- Tap the green Handset button
-
-

From Function keys
Note: Before using the feature, configure function keys (FK) in Collaboration -> Settings -> Function keys. Max. 20 function keys.
-
-
-
- Tap Dialpad and select Function keys to switch to Function keys menu
- Tap on a function key you wish to call
- Select Call from the drop-down list
-
-
From Enterprise contacts
Note: by default the local contacts from your device's phonebook appear in this menu
-
-
-
- Tap the contact number you wish to call
- Tap the number you wish to call
-
-
Note: a call is made using the mode selected in Dialpad menu (VoIP / Callback / Direct Call)
From History / Voicemail
-
-
-
- Go to History (All or Missed tab) / Voicemail
- Tap on user / a voicemail message
- Select Call from the drop-down list
- Go to History (All or Missed tab) / Voicemail
-
-
From Voicemail
-
-
-
- Go to Voicemail
- Tap on a voicemail message from a user you want to call
- Select Call from the drop-down list
-
-
From Chat
-
-
-
- Open a chat session with a user
- Tap the Handset button
- The call is placed automatically
-
-
Note: Android Collaboration app supports receiving Call me back messages (it is not possible to send a Call me back) message currently) To place a call tap Call me back.
From your device's contacts
-
-
-
- Tap a contact in your Android contacts
- Tap a phone number that you wish to call
- Select Wildix
-
-
From a Browser (supporting URI for call generation)
Due to URI support a call can be initiated from a browser by clicking on a link containing a phone number. It allows calls to be placed from web pages.
Answer a call
-
-
-
- Swipe the green Handset button left to answer
- Swipe the red Handset button right to answer
-
-
Pick up a call of another user / call group
Note: only users with certain permissions can pick up calls.
To pick up a call ringing another user / call group
-
-
-
- Go to Function keys menu
- Tap on the user / call group receiving the incoming call
- Choose Pickup from the drop-down list
-
-
Call management
During a call you can navigate your device, open the App and tap Active call to come back to the active call.

-
-
- - Mute
- - Video
- Hold
- - Transfer. Select the needed option from the list: Contact (choose a contact from Contacts / Number (dial a number you wish to call from Dialpad / Function key (select FK to transfer the call.
- - Record a call
- - Speakerphone.
- - Conference
- - Hang up
- - DTMF
- - Switch back to Dialpad / Function keys tabs to make a call
-
Transfer
Blind transfer
(transfer without notification)
Attended transfer
(transfer with notification)
Switch between 2 active calls
To switch between 2 active calls, swipe left / right
The second call is put on hold
Control of active calls on other devices and call continuity
Control of active calls on other devices
The feature allows you to view and control your own active calls on other devices registered to your account. You can hold / resume, record, hangup a call as well as send DTMF.
Call continuity
A call can be passed from other devices to iOS or other specific devices.
To pass an active call to iOS Collaboration app:
-
-
- Tap Call continuity button
- A call is automatically picked up on Android
-
To pass an active call to a specific device:
-
-
- Tap and hold Call continuity button
- Select a device from the list
- A call is automatically picked on the selected device
-

Chat (4)
All the colleagues added to your roster appear in Chat menu.
-
-
- Tap Chat
- Use the search field to find a user
- Tap a user and enter your message
- Tap the Paper plane icon to send the message
-
Note: To delete a chat session with a user, swipe it left.
Start a chat session from live search results
-
-
- Start entering user's name or number / extension in the search field to find a user
- Tap on a user you wish to chat. Select Chat from the list
-
Start a chat session from History
You can also start a chat session with a user from the History tab.
-
-
- Go to History (2)
- Select a user you would like to chat with and tap the double Arrowhead icon to view user contact details
- Tap Chat
- Go to History (2)
-
Note: If you delete a chat session with a user, you can restore it from History via Chat option.
Send a File / an Image / a Post-it / Call me back
Send a file / image
-
-
- Start a chat with a user
- Tap +
- Select the source : Camera / Photo & Video Library / Downloads
- Select files / images or take a photo using the camera to be sent (you can send up to 10 files / images)
- Tap Send button
- Confirm by tapping Send
-
Note: The maximum file size to be sent is 100Mb.

Send a Post-it
-
-
- Start a chat with a user
- Write your message
- Tap +
- Select the option Send as Post-it
-
Send a voice recording
-
-
- Start a chat with a user
- Press and hold the Microphone icon to record a message
- Release the button to send
-
Note: To cancel voice recording without sending, slide left.
Delete Chats
-
-
- Select chats you would like to delete by holding them
- Tap the Trash icon to delete
-
Participate in Wizyconf videoconference
-
-
- Open a chat session with a user who sent an invitation
- Tap on the invitation
- Select Join to enter the conference room or Call to access the conference in audio-only mode.
- to leave the conference room tap Exit the conference (X)
-
Current limitations:
-
-
- It is not possible to create a conference from the Android app; it is possible to participate in the conference if you were invited (you receive an invitation via chat)
- Camera (rear / front) and microphone names are not displayed
- It is not possible to switch between front and rear cameras after entering a conference.
-
Multiuser group chat
Multiuser cloud-stored group chats enable up to 500 participants and send images / files
Limitations
-
-
- not available with PBXs with LifeTime licenses
- no more than 100 group chats can be received from the server
- if user opens a push notification from a group chat after being removed by the owner , one-to-one chat with the user who sent the message is opened
-
Create a group chat
-
-
- Tap +
- Edit the group title (optional)
- Add participants
- Tap Done to finish
-
Leave the group chat:
Note: it is only possible to leave a group chat via the app. To close it completely a group chat manager needs to remove it in Collaboration.
All the participants including the owner can leave a group chat:
-
-
- Select a group chat you would like to delete by holding it
- Tap the Trash icon to leave
-
History (2)
Note: Call history and missed calls notifications are synced over the PBX among all the devices registered to your account (except W-AIR handsets)
Tap History to access the log of calls and voicemails. Incoming, outgoing and missed calls (highlighted in red) are displayed in the All tab. To view only missed calls tap the Missed tap.
To view voicemail messages tap the Voicemail tab.
Tap the double Arrowhead icon to view user contact details and a call log
Voicemails
-
-
- Tap Voicemail tab
- To download a voicemail message tap the message
- To play it back tap the Play button
- tap on a voicemail message to display the drop-down list: Call a user who left a message, Mark as read or Delete it
-
Multi-edit of Voicemails:
-
-
- Select one or multiple Voicemails
- Click Mark as read or Delete icon
-
Log Out
-
-
- Tap Settings
- Tap the Log out icon
- Tap Settings
-

Set Active Device on Wildix
Logging Into Collaboration
Head over to your Wildix Domain to login to collaboration. This will usually be https://companyname.wildixin.com/

Setting your active device
You can select your active device by clicking the drop down next to the call button, followed by the device you wish to set as active.

Once selected, that selected device will be the device where calls are sent from and to.
Ringing Only Active Device
Should you wish to only ring your active, you can go into settings and check to make sure that the 'Ring only active device' option is selected on your personal account settings. You can do this by going to the Settings tab, the Personal side tab and then turning on 'Ring only active device', then pressing save.

Setting the Collaboration App as your active device
Due to a feature with the mobile apps to save battery life, upon selecting the drop down for active devices, your mobile app may not appear. To do this, first open the mobile app on your phone. This will connect back up to the phone system and should then should be able to be selected in the active device dropdown list.
Wildix Feature Codes
Summary
Feature Codes tell the phone system to do something useful, such as record a call or forward your calls. Here are some useful codes:
| Code | Action |
| *1 | Start and Stop recording the current call |
| *2 | Pause recording. If you are recording a call you can use this to pause the current recording |
| 60 | Set your status to Do Not Disturb. Incoming calls will be rejected or, if you have voicemail, diverted there |
| 61 |
Call Forward Busy. Use this to forward your calls to another destination if you are already on a call |
| 62 |
Call Forward No Answer. Use this to forward your calls to another destination if you do not answer a call |
| 63 |
Call Forward All. This will forward all your calls to the given number |
| 64 |
Call Waiting. Use this to enable / disable hearing a beep when a second call comes in |
| 81 |
Access your voicemail to listen to your messages and record your greetings |
| 92 |
Withold your number on an outgoing call. The recipient will see "Anonymous" instead of your number |
| 88 |
Call Pickup. If enabled for you, you can pick up the call on another extension. |
| #9 |
Blind transfer. Transfer a call to another party and leave the call |
| #8 |
Attended transfer. Transfer a call to another party, speaking to them first |
| 84 |
Personal Voice Recording. Use this to record yourself, the recording will then be emailed to you |
| 74 |
Phone System Recording. If set, this will enable you to record your own greetings to be used by your organisation |
<END OF DOCUMENT>