Windows
- 65.001 How to stop Acrobat opening PDF files and choose another app to open them
- 65.003 Windows 11 Start Button and Search box unresponsive
- 65.004 Uninstall Atera from a Windows PC
- 65.007 Add Microsoft 365 MS365 Azure account to administrators group on Windows PC
- 65.009 Splashtop disable audio over remote connection
- 65.010 Windows 10 / Windows 11 Azure Domain Joined remove Microsoft 365 profile
- 65.012 Can't unpin Quick Start links in Windows Explorer
- 65.013 Set up Windows 11 without internet connection
- 65.014 Windows Server: Get a list of Active Directory users using PowerShell
- 65.016 Change or reset your Windows Hello PIN
- 65.044 Canon Printer update failed in Windows Update. Don't have a Canon printer
- 65.048 Add Google GCPW account to administrators group on Windows PC
- 65.049 Change a computer name via command line
- 65.050 Stopping Edge opening PDF documents
- 65.051 Changing the SID of a Windows device
- 65.052 Moving the Recovery Partition to extend a partition size
65.001 How to stop Acrobat opening PDF files and choose another app to open them
 |
Docs |
Document Control
|
Document Name |
65.001 How to stop Acrobat opening PDF files and choose another app to open them |
||
|
Version |
v1.0 Current |
||
|
Author |
Neil Tancock, IT Services (Safeharbour Support Ltd), neil@safeharboursupport.com |
||
|
Approval |
Safeharbour Support |
||
|
Approval date |
01-JAN-2025 |
Review date |
31-DEC-2027 |
|
Absract |
Sometimes having your PDF documents open in Adobe Acrobat is not ideal and you may want to change that to another program like Google Chrome or Microsoft Edge. Choosing another program to open PDF documents is straightforward |
||
|
Scope |
This document applies to all clients of Safeharbour Support Ltd |
||
|
Inputs |
None |
||
|
Outputs |
None |
||
Change Control
|
Date |
Author |
Version |
Change |
|
02-DEC-2024 |
Neil Tancock |
0.0 |
First version |
|
01-JAN-2025 |
Neil Tancock |
1.0 |
Approved |
--------------------------------------------<START OF DOCUMENT> --------------------------------------------
Choosing another program to open PDF documents is straightforward
- Open File Explorer in Windows and find a .PDF document. Any PDF will do
- Right-click on the PDF document, click on Open with > and then choose a new program to open the PDF with. It'll then test it by opening the PDF document in the program you chose.

If you can't find the program in the list offered, click on "Choose another app" and you will be offered a more extensive list of programs that can open PDF documents. If you still can't find the app you want you can extend the list further or even browse your computer for the app you want.
--------------------------------------------<END OF DOCUMENT> --------------------------------------------
|
Need help? Get in touch! |
|
You can call us on 01752 373000, option 2 or, if you are on Number Club, just call extension 3001 You can email us at hub@safeharboursupport.com You can Whatsapp us right here: https://wa.me/441752373000 |
|
|
65.003 Windows 11 Start Button and Search box unresponsive
|
Docs |
Document Control
|
Document Name |
65.003 Windows 11 Start Button and Search box unresponsive |
||
|
Version |
v1.0 Current |
||
|
Author |
Neil Tancock, IT Services (Safeharbour Support Ltd), neil@safeharboursupport.com |
||
|
Approval |
Safeharbour Support |
||
|
Approval date |
01-JAN-2025 |
Review date |
31-DEC-2027 |
|
Absract |
process StartMenuExperienceHost.exe crashes Acronis Device Control |
||
|
Scope |
This document applies to all clients of Safeharbour Support Ltd |
||
|
Inputs |
None |
||
|
Outputs |
None |
||
Change Control
|
Date |
Author |
Version |
Change |
|
02-DEC-2024 |
Neil Tancock |
0.0 |
First version |
|
01-JAN-2025 |
Neil Tancock |
1.0 |
Approved |
--------------------------------------------<START OF DOCUMENT> --------------------------------------------
If you're running Windows 11 and the Start Button & Search Box are unresponsive, it's likely that the Start Menu Experience process is crashing.

This was, in this case, caused by a bug in Acronis backup tool, specifically the Device Control feature. Acronis are working on a fix but it's advisable to disable Device Control in the Acronis portal. The Start Menu and Search Box will work normally after.
https://kb.acronis.com/content/72828
72828: Acronis Cyber Protect Cloud: Windows Start button and Find not working after Windows update KB5030219 if Advanced DLP or Device Control service is enabl
Symptoms
- Cyber Protect Cloud Agent is installed on physical Windows 11 machines
- Advanced DLP or Device Control feature is enabled in the protection plan
- After updating Windows to KB5030219, the Start button and Find are no longer working.
Cause
Issue in the product.
Acronis Development team is working on a fix.
This issue will be resolved in one of the upcoming releases.
--------------------------------------------<END OF DOCUMENT> --------------------------------------------
|
Need help? Get in touch! |
|
You can call us on 01752 373000, option 2 or, if you are on Number Club, just call extension 3001 You can email us at hub@safeharboursupport.com You can Whatsapp us right here: https://wa.me/441752373000 |
|
|
65.004 Uninstall Atera from a Windows PC
|
Docs |
Document Control
|
Document Name |
65.004 Uninstall Atera from a Windows PC |
||
|
Version |
v1.0 Current |
||
|
Author |
Neil Tancock, IT Services (Safeharbour Support Ltd), neil@safeharboursupport.com |
||
|
Approval |
Safeharbour Support |
||
|
Approval date |
01-JAN-2025 |
Review date |
31-DEC-2027 |
|
Absract |
If you don't have access to the Atera management portal you can uninstall Atera manually. This is also useful if you have reinstalled Atera and it will not connect. |
||
|
Scope |
This document applies to all clients of Safeharbour Support Ltd |
||
|
Inputs |
None |
||
|
Outputs |
None |
||
Change Control
|
Date |
Author |
Version |
Change |
|
02-DEC-2024 |
Neil Tancock |
0.0 |
First version |
|
01-JAN-2025 |
Neil Tancock |
1.0 |
Approved |
--------------------------------------------<START OF DOCUMENT> --------------------------------------------
Either use these commands (The registry ones are the important ones if you have uninstalled Atera and Splashtop):
msiexec /x {EFB51F01-9805-4293-BB16-6F17EF4CEDF2} /qn
timeout /t 5 /nobreak >nul
sc stop AteraAgent > nul 2> nul
sc delete AteraAgent > nul 2> nul
taskkill /f /im TicketingTray.exe > nul 2> nul
REG DELETE "HKEY_CURRENT_USER\Software\ATERA Networks" /f > nul 2> nul
RMDIR /S /Q "%userprofile%\appdata\local\temp\TrayIconCaching" > nul 2> nul
taskkill /f /im AteraAgent.exe > nul 2> nul
taskkill /f /im TicketingTray.exe > nul 2> nul
taskkill /f /im AgentPackageMonitoring > nul 2> nul
taskkill /f /im AgentPackageInformation > nul 2> nul
taskkill /f /im AgentPackageRunCommandInteractive > nul 2> nul
taskkill /f /im AgentPackageEventViewer.exe > nul 2> nul
taskkill /f /im AgentPackageSTRemote.exe > nul 2> nul
taskkill /f /im AgentPackageInternalPoller.exe > nul 2> nul
taskkill /f /im AgentPackageWindowsUpdate.exe > nul 2> nul
taskkill /f /im AgentPackageSystemTools.exe > nul 2> nul
taskkill /f /im AgentPackageHeartbeat.exe > nul 2> nul
taskkill /f /im AgentPackageUpgradeAgent > nul 2> nul
taskkill /f /im AgentPackageProgramManagement > nul 2> nul
taskkill /f /im AgentPackageRegistryExplorer.exe > nul 2> nul
timeout /t 4 /nobreak >nul
REG DELETE "HKEY_CURRENT_USER\Software\ATERA Networks" /f > nul 2> nul
REG DELETE "HKEY_LOCAL_MACHINE\SOFTWARE\ATERA Networks" /f > nul 2> nul
REG DELETE "HKEY_CLASSES_ROOT\Installer\Products\4758948C95C1B194AB15204D95B42292" /f > nul 2> nul
REG DELETE "HKEY_CLASSES_ROOT\Installer\Products\10F15BFE50893924BB61F671FEC4DE2F" /f > nul 2> nul
RMDIR /S /Q "C:\Program Files\ATERA Networks\AteraAgent" > nul 2> nul
RMDIR /S /Q "C:\Program Files (x86)\ATERA Networks" > nul 2> nul
--------------------------------------------<END OF DOCUMENT> --------------------------------------------
|
Need help? Get in touch! |
|
You can call us on 01752 373000, option 2 or, if you are on Number Club, just call extension 3001 You can email us at hub@safeharboursupport.com You can Whatsapp us right here: https://wa.me/441752373000 |
|
|
65.007 Add Microsoft 365 MS365 Azure account to administrators group on Windows PC
|
Docs |
Document Control
|
Document Name |
65.007 Add Microsoft 365 MS365 Azure account to administrators group on Windows PC |
||
|
Version |
v1.0 Current |
||
|
Author |
Neil Tancock, IT Services (Safeharbour Support Ltd), neil@safeharboursupport.com |
||
|
Approval |
Safeharbour Support |
||
|
Approval date |
01-JAN-2025 |
Review date |
31-DEC-2027 |
|
Absract |
None |
||
|
Scope |
This document applies to all clients of Safeharbour Support Ltd |
||
|
Inputs |
None |
||
|
Outputs |
None |
||
Change Control
|
Date |
Author |
Version |
Change |
|
02-DEC-2024 |
Neil Tancock |
0.0 |
First version |
|
01-JAN-2025 |
Neil Tancock |
1.0 |
Approved |
--------------------------------------------<START OF DOCUMENT> --------------------------------------------
Net localgroup Administrators /add "AzureAD\name@domain.com"
--------------------------------------------<END OF DOCUMENT> --------------------------------------------
|
Need help? Get in touch! |
|
You can call us on 01752 373000, option 2 or, if you are on Number Club, just call extension 3001 You can email us at hub@safeharboursupport.com You can Whatsapp us right here: https://wa.me/441752373000 |
|
|
65.009 Splashtop disable audio over remote connection
|
Docs |
Document Control
|
Document Name |
65.009 Splashtop disable audio over remote connection |
||
|
Version |
v1.0 Current |
||
|
Author |
Neil Tancock, IT Services (Safeharbour Support Ltd), neil@safeharboursupport.com |
||
|
Approval |
Safeharbour Support |
||
|
Approval date |
01-JAN-2025 |
Review date |
31-DEC-2027 |
|
Absract |
When accessing a device via Splashtop, the user's audio will come through the link. While not really an issue - you may like thrash metal - it can be problematic if you are using VoIP to call them; the audio will cut off. |
||
|
Scope |
This document applies to all clients of Safeharbour Support Ltd |
||
|
Inputs |
None |
||
|
Outputs |
None |
||
Change Control
|
Date |
Author |
Version |
Change |
|
02-DEC-2024 |
Neil Tancock |
0.0 |
First version |
|
01-JAN-2025 |
Neil Tancock |
1.0 |
Approved |
--------------------------------------------<START OF DOCUMENT> --------------------------------------------
When accessing a device via Splashtop, the user's audio will come through the link. While not really an issue - you may like thrash metal - it can be problematic if you are using VoIP to call them; the audio will cut off.
Here's what to do:
--------------------------------------------<END OF DOCUMENT> --------------------------------------------
|
Need help? Get in touch! |
|
You can call us on 01752 373000, option 2 or, if you are on Number Club, just call extension 3001 You can email us at hub@safeharboursupport.com You can Whatsapp us right here: https://wa.me/441752373000 |
|
|
65.010 Windows 10 / Windows 11 Azure Domain Joined remove Microsoft 365 profile
|
Docs |
Document Control
|
Document Name |
65.010 Windows 10 / Windows 11 Azure Domain Joined remove Microsoft 365 profile |
||
|
Version |
v1.0 Current |
||
|
Author |
Neil Tancock, IT Services (Safeharbour Support Ltd), neil@safeharboursupport.com |
||
|
Approval |
Safeharbour Support |
||
|
Approval date |
01-JAN-2025 |
Review date |
31-DEC-2027 |
|
Absract |
None |
||
|
Scope |
This document applies to all clients of Safeharbour Support Ltd |
||
|
Inputs |
None |
||
|
Outputs |
None |
||
Change Control
|
Date |
Author |
Version |
Change |
|
02-DEC-2024 |
Neil Tancock |
0.0 |
First version |
|
01-JAN-2025 |
Neil Tancock |
1.0 |
Approved |
--------------------------------------------<START OF DOCUMENT> --------------------------------------------
On an Azure domain-joined computer, the profile is created from their account and no local account is created. To remove the profile, go to System Properties (Like you are going to AD join the computer) and click on Profiles. You can delete the profile from there.
--------------------------------------------<END OF DOCUMENT> --------------------------------------------
|
Need help? Get in touch! |
|
You can call us on 01752 373000, option 2 or, if you are on Number Club, just call extension 3001 You can email us at hub@safeharboursupport.com You can Whatsapp us right here: https://wa.me/441752373000 |
|
|
65.012 Can't unpin Quick Start links in Windows Explorer
|
Docs |
Document Control
|
Document Name |
65.012 Can't unpin Quick Start links in Windows Explorer |
||
|
Version |
v1.0 Current |
||
|
Author |
Neil Tancock, IT Services (Safeharbour Support Ltd), neil@safeharboursupport.com |
||
|
Approval |
Safeharbour Support |
||
|
Approval date |
01-JAN-2025 |
Review date |
31-DEC-2027 |
|
Absract |
If you're unpinning a Quick Start entry they will normally go away as soon as you unpin them. If they don't this procedure is for you. |
||
|
Scope |
This document applies to all clients of Safeharbour Support Ltd |
||
|
Inputs |
None |
||
|
Outputs |
None |
||
Change Control
|
Date |
Author |
Version |
Change |
|
02-DEC-2024 |
Neil Tancock |
0.0 |
First version |
|
01-JAN-2025 |
Neil Tancock |
1.0 |
Approved |
--------------------------------------------<START OF DOCUMENT> --------------------------------------------
If you're unpinning a Quick Start entry they will normally go away as soon as you unpin them.
If they don't this procedure is for you.
The pins are referred to as Automatic Destinations and Windows keeps a little list of all the pins it needs to show you. Sometimes that list can get a little messed up, Windows gets confused and you have persistent Pins.
If you know your folder name:
If you know your own folder name on your computer, press the Windows key and then R and then paste this in, replacing [your username] with your own folder name:
C:\Users\[your_username]\AppData\Roaming\Microsoft\windows\recent\automaticdestinations
Then click Ok
If you don't know your folder name:
If you don't know your own folder name on your computer:
- Open File Explorer and navigate to the C: drive
- Then open the Users folder. You should see your folder in there, it will likely be your username that you use when you log in; make a note of the name.
- Press the Windows key and then R and then paste this in, replacing [your username] with your own folder name
C:\Users\[your_username]\AppData\Roaming\Microsoft\windows\recent\automaticdestinations
- Then click Ok
As an example, if your login was neil you would enter this:
C:\Users\neil\AppData\Roaming\Microsoft\windows\recent\automaticdestinations
Clearing out the Pins
Once you've navigated to the right folder, you will see lots of files that look like this:

- Click on the first file in the list to highlight it - in this case the file begins with 1bc392 - then press the control key and then A key together to they look like this:

- Now press the keypad key marked "Delete" (Not the Backspace key above the Enter key) and all the files will disappear. A couple may come back as they are regenerated automatically by Windows.
- All the errant Quick Start entries should now have disappeared, barring the Desktop, Downloads and Pictures ones as they are automatically maintained by Windows.
- The procedure is complete - close down the File Explorer window
--------------------------------------------<END OF DOCUMENT> --------------------------------------------
|
Need help? Get in touch! |
|
You can call us on 01752 373000, option 2 or, if you are on Number Club, just call extension 3001 You can email us at hub@safeharboursupport.com You can Whatsapp us right here: https://wa.me/441752373000 |
|
|
65.013 Set up Windows 11 without internet connection
|
Docs |
Document Control
|
Document Name |
65.013 Set up Windows 11 without internet connection |
||
|
Version |
v1.0 Current |
||
|
Author |
Neil Tancock, IT Services (Safeharbour Support Ltd),neil@safeharboursupport.com |
||
|
Approval |
Safeharbour Support |
||
|
Approval date |
01-JAN-2025 |
Review date |
31-DEC-2027 |
|
Absract |
None |
||
|
Scope |
This document applies to all clients of Safeharbour Support Ltd |
||
|
Inputs |
None |
||
|
Outputs |
None |
||
Change Control
|
Date |
Author |
Version |
Change |
|
02-DEC-2024 |
Neil Tancock |
0.0 |
First version |
|
01-JAN-2025 |
Neil Tancock |
1.0 |
Approved |
--------------------------------------------<START OF DOCUMENT> --------------------------------------------
For those that need to setup Win 11 without an internet connection, here is how to do it:
- On the setup screen where it asks you to connect to the internet, press Shift + F10 to bring up the command prompt.
- OOBE\BYPASSNRO [ENTER]
The system will restart and you will see an option to continue without internet connection
--------------------------------------------<END OF DOCUMENT> --------------------------------------------
|
Need help? Get in touch! |
|
You can call us on 01752 373000, option 2 or, if you are on Number Club, just call extension 3001 You can email us at hub@safeharboursupport.com You can Whatsapp us right here: https://wa.me/441752373000 |
|
|
65.014 Windows Server: Get a list of Active Directory users using PowerShell
Browse to OU in Users & Computers
Right-click OU folder and choose properties
Click on Attribute editor tab and find distinguishedName record
Double click the record to open it and then copy the contents of the record
Start - PowerShell
Right-click PowerShell and choose run as administrator
Get-ADUser -Filter * -SearchBase "<REPLACE THIS WITH THE TEXT YOU COPIED>" -Properties * | Export-Csv "c:\ADUsers.csv"
The list will be in c:\ADUsers.csv
--------------------------------------------<END OF DOCUMENT> --------------------------------------------
|
Need help? Get in touch! |
|
You can call us on 01752 373000, option 2 or, if you are on Number Club, just call extension 3001 You can email us at hub@safeharboursupport.com You can Whatsapp us right here: https://wa.me/441752373000 |
|
|
Document Control
|
Document Name |
65.014 Windows Server: Get a list of Active Directory users using PowerShell |
||
|
Version |
v1.0 Current |
||
|
Author |
Neil Tancock, IT Services (Safeharbour Support Ltd), neil@safeharboursupport.com |
||
|
Approval |
Safeharbour Support |
||
|
Approval date |
01-JAN-2025 |
Review date |
31-DEC-2027 |
|
Absract |
None |
||
|
Scope |
This document applies to all clients of Safeharbour Support Ltd |
||
|
Inputs |
None |
||
|
Outputs |
None |
||
Change Control
|
Date |
Author |
Version |
Change |
|
02-DEC-2024 |
Neil Tancock |
0.0 |
First version |
|
01-JAN-2025 |
Neil Tancock |
1.0 |
Approved |
This is an uncontrolled copy when printed - please refer to the electronic version for the latest version
65.016 Change or reset your Windows Hello PIN
A PIN is a user-defined set of numbers, or a combination of numbers and letters, that allows you to sign in to your Windows device instead of a password.
Your PIN is securely stored on your device, it isn’t transmitted anywhere, and it isn’t stored on a server. This makes it more secure than a traditional password.
If you want to change your PIN, or need to reset it, you have different options.
You can use the Settings app to change your PIN.
-
In the Settings app on your Windows device, select Accounts > Sign-in options or use the following shortcut:
-
Select PIN (Windows Hello) > Change PIN , and then follow the instructions. You must enter your old PIN in order to change to a new one
-
If you forgot your PIN, select I forgot my PIN and follow the directions to verify your account and create a new one
--------------------------------------------<END OF DOCUMENT> --------------------------------------------
|
Need help? Get in touch! |
|
You can call us on 01752 373000, option 2 or, if you are on Number Club, just call extension 3001 You can email us at hub@safeharboursupport.com You can Whatsapp us right here: https://wa.me/441752373000 |
|
|
Document Control
|
Document Name |
65.016 Change or reset your Windows Hello PIN |
||
|
Version |
v1.0 Current |
||
|
Author |
Neil Tancock, IT Services (Safeharbour Support Ltd), neil@safeharboursupport.com |
||
|
Approval |
Safeharbour Support |
||
|
Approval date |
01-JAN-2025 |
Review date |
31-DEC-2027 |
|
Absract |
None |
||
|
Scope |
This document applies to all clients of Safeharbour Support Ltd |
||
|
Inputs |
None |
||
|
Outputs |
None |
||
Change Control
|
Date |
Author |
Version |
Change |
|
02-DEC-2024 |
Neil Tancock |
0.0 |
First version |
|
01-JAN-2025 |
Neil Tancock |
1.0 |
Approved |
This is an uncontrolled copy when printed - please refer to the electronic version for the latest version
65.044 Canon Printer update failed in Windows Update. Don't have a Canon printer
If Windows update is stuck in a loop of installing / failing to install updates for a Canon printer, remove the printer from the printer list:
- From an elevated command prompt
- printui /s /t2[ENTER]
This will bring up the Print Server properties page:
- Click on the printer you would like to remove, and click on [Remove]
- Click on Remove driver and driver package
- Click on [Ok]
- Confirm that you want to delete the printer by clicking [Yes]
- The uninstall will commence and then pause, asking you to confirm the delete once more. Click on [Delete] to confirm the delete
- Click on [Close]
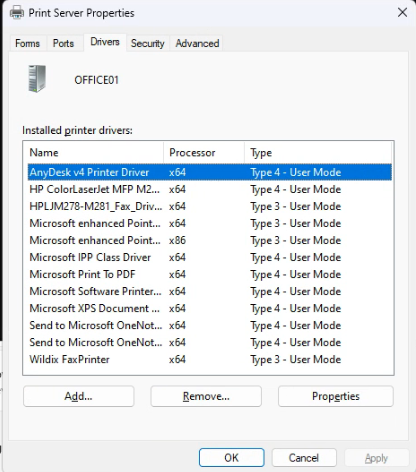
--------------------------------------------<END OF DOCUMENT> --------------------------------------------
|
Need help? Get in touch! |
|
You can call us on 01752 373000, option 2 or, if you are on Number Club, just call extension 3001 You can email us at hub@safeharboursupport.com You can Whatsapp us right here: https://wa.me/441752373000 |
|
|
Document Control
|
Document Name |
65.044 Canon Printer update failed in Windows Update. Don't have a Canon printer. |
||
|
Version |
v1.0 Current |
||
|
Author |
Neil Tancock, IT Services (Safeharbour Support Ltd), neil@safeharboursupport.com |
||
|
Approval |
Safeharbour Support |
||
|
Approval date |
03-MAR-2025 |
Review date |
31-DEC-2027 |
|
Absract |
None |
||
|
Scope |
This document applies to all clients of Safeharbour Support Ltd |
||
|
Inputs |
None |
||
|
Outputs |
None |
||
This is an uncontrolled copy when printed - please refer to the electronic version for the latest version
Change Control
|
Date |
Author |
Version |
Change |
|
03-MAR-2025 |
Neil Tancock |
0.0 |
First version |
|
03-MAR-2025 |
Neil Tancock |
1.0 |
Approved |
This is an uncontrolled copy when printed - please refer to the electronic version for the latest version
65.048 Add Google GCPW account to administrators group on Windows PC
|
Docs |
Document Control
|
Document Name |
65.048 Add Google GCPW account to administrators group on Windows PC |
||
|
Version |
v1.0 Current |
||
|
Author |
Neil Tancock, IT Services (Safeharbour Support Ltd), neil@safeharboursupport.com |
||
|
Approval |
Safeharbour Support |
||
|
Approval date |
22-MAY-2025 |
Review date |
21-MAY-2027 |
|
Absract |
None |
||
|
Scope |
This document applies to all clients of Safeharbour Support Ltd |
||
|
Inputs |
None |
||
|
Outputs |
None |
||
Change Control
|
Date |
Author |
Version |
Change |
|
22-MAY-2024 |
Neil Tancock |
0.0 |
First version |
|
22-MAY-2025 |
Neil Tancock |
1.0 |
Approved |
--------------------------------------------<START OF DOCUMENT> --------------------------------------------
- net user (To show list of usernames)
- net localgroup Administrators /add "username"
--------------------------------------------<END OF DOCUMENT> --------------------------------------------
|
Need help? Get in touch! |
|
You can call us on 01752 373000, option 2 or, if you are on Number Club, just call extension 3001 You can email us at hub@safeharboursupport.com You can Whatsapp us right here: https://wa.me/441752373000 |
|
|
65.049 Change a computer name via command line
|
Docs |
Document Control
|
Document Name |
65.049 Change a computer name via command line |
||
|
Version |
v1.0 Current |
||
|
Author |
Neil Tancock, IT Services (Safeharbour Support Ltd), neil@safeharboursupport.com |
||
|
Approval |
Safeharbour Support |
||
|
Approval date |
22-MAY-2025 |
Review date |
21-MAY-2027 |
|
Absract |
None |
||
|
Scope |
This document applies to all clients of Safeharbour Support Ltd |
||
|
Inputs |
None |
||
|
Outputs |
None |
||
Change Control
|
Date |
Author |
Version |
Change |
|
22-MAY-2024 |
Neil Tancock |
0.0 |
First version |
|
22-MAY-2025 |
Neil Tancock |
1.0 |
Approved |
--------------------------------------------<START OF DOCUMENT> --------------------------------------------
- wmic computersystem where name=”%computername%” call rename name=”SHB-PC001”
--------------------------------------------<END OF DOCUMENT> --------------------------------------------
|
Need help? Get in touch! |
|
You can call us on 01752 373000, option 2 or, if you are on Number Club, just call extension 3001 You can email us at hub@safeharboursupport.com You can Whatsapp us right here: https://wa.me/441752373000 |
|
|
65.050 Stopping Edge opening PDF documents
|
Docs |
Document Control
|
Document Name |
65.050 Stopping Edge opening PDF documents |
||
|
Version |
v1.0 Current |
||
|
Author |
Neil Tancock, IT Services (Safeharbour Support Ltd), neil@safeharboursupport.com |
||
|
Approval |
Safeharbour Support |
||
|
Approval date |
19-SEP-2025 |
Review date |
19-SEP-2027 |
|
Absract |
None |
||
|
Scope |
This document applies to all clients of Safeharbour Support Ltd |
||
|
Inputs |
None |
||
|
Outputs |
None |
||
Change Control
|
Date |
Author |
Version |
Change |
|
19-SEP-2025 |
Neil Tancock |
0.0 |
First version |
|
19-SEP-2025 |
Neil Tancock |
1.0 |
Approved |
--------------------------------------------<START OF DOCUMENT> --------------------------------------------
- Open Microsoft Edge
- Click on the three dots (…) from the right top corner.
- Select Settings from the drop down and click on Site permissions from the left pane.
- Scroll down and click on PDF documents, Toggle the switch to On for Always open PDF files externally.
--------------------------------------------<END OF DOCUMENT> --------------------------------------------
|
Need help? Get in touch! |
|
You can call us on 01752 373000, option 2 or, if you are on Number Club, just call extension 3001 You can email us at hub@safeharboursupport.com You can Whatsapp us right here: https://wa.me/441752373000 |
|
|
65.051 Changing the SID of a Windows device
|
Docs |
Document Control
|
Document Name |
65.051 Changing the SID of a Windows device |
||
|
Version |
v1.0 Current |
||
|
Author |
Neil Tancock, IT Services (Safeharbour Support Ltd), neil@safeharboursupport.com |
||
|
Approval |
Safeharbour Support |
||
|
Approval date |
22-SEP-2025 |
Review date |
19-SEP-2027 |
|
Abstract |
None |
||
|
Scope |
This document applies to all clients of Safeharbour Support Ltd |
||
|
Inputs |
None |
||
|
Outputs |
None |
||
Change Control
|
Date |
Author |
Version |
Change |
|
22-SEP-2025 |
Neil Tancock |
0.0 |
First version |
|
22-SEP-2025 |
Neil Tancock |
1.0 |
Approved |
--------------------------------------------<START OF DOCUMENT> --------------------------------------------
A SID is a unique identifier of a Windows device and looks like this;
S-1-5-21-2816856249-3831496029-3538816327
Microsoft have said that a SID is not important. However it can cause issues with File&Print services as SMB clients use the SID to identify each other.
When KB5065426 was released in September 2025, any Windows device that had the same SID as another - if they had, for example, been cloned - would refuse to connect, citing a bad Username & Password. The target system immediately shows LSA(LsaSrv) Event ID 6167 "There is a partial mismatch in the machine ID. This indicates that the ticket has either been manipulated or it belongs to a different boot session. Failing authentication."
To find the current SID of a system;
- Download and unzip PS Tools
- Run command prompty as administrator
- cd to the directory you expanded PS Tools into
- psgetsid64[ENTER]
This will display the current SID of the system. Make a note of it.
To change the SID of a system
- Go to https://www.stratesave.com/html/downloads.html and download SIDCHG 64 bit
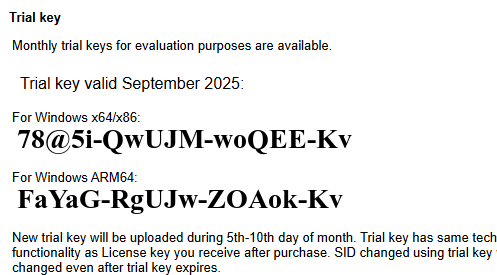
- Go to https://www.stratesave.com/html/sidchg.html and scroll down to the trial key. Make a note of it. you will need to write it down manually.

- Switch off the responsive firewall
- Start -> Settings
- Privacy & Security
- Windows Security
- Virus & Threat Protection
- In Virus & threat protection settings, click Manage settings
- Disable Real-time protection
- Run command prompt on the system as Administrator
- cd to the folder you downloaded the sidchg exe into
- Run the SID changer;
- sidchg64-3.0m.exe /R
- It will ask for the licence key, enter the one you noted
- It MAY say that a service needs to be stop and to restart. If so, do so and then run these commands again, including disabling Real-time protection
- Say y to the prompt, the SID will be changed, you will be logged out the machine will restart. DO not restart it manually or log in until the machine has restarted itself
- Once the machine has restarted and is showing the login prompt without the black SID IS CHANGING screen, it is safe to log in. Run PS Tools again to confirm the SID has changed,
--------------------------------------------<END OF DOCUMENT> --------------------------------------------
|
Need help? Get in touch! |
|
You can call us on 01752 373000, option 2 or, if you are on Number Club, just call extension 3001 You can email us at hub@safeharboursupport.com You can Whatsapp us right here: https://wa.me/441752373000 |
|
|
65.052 Moving the Recovery Partition to extend a partition size
Here’s how to correctly move the Windows Recovery Partition on a Windows server or a normal Windows system.
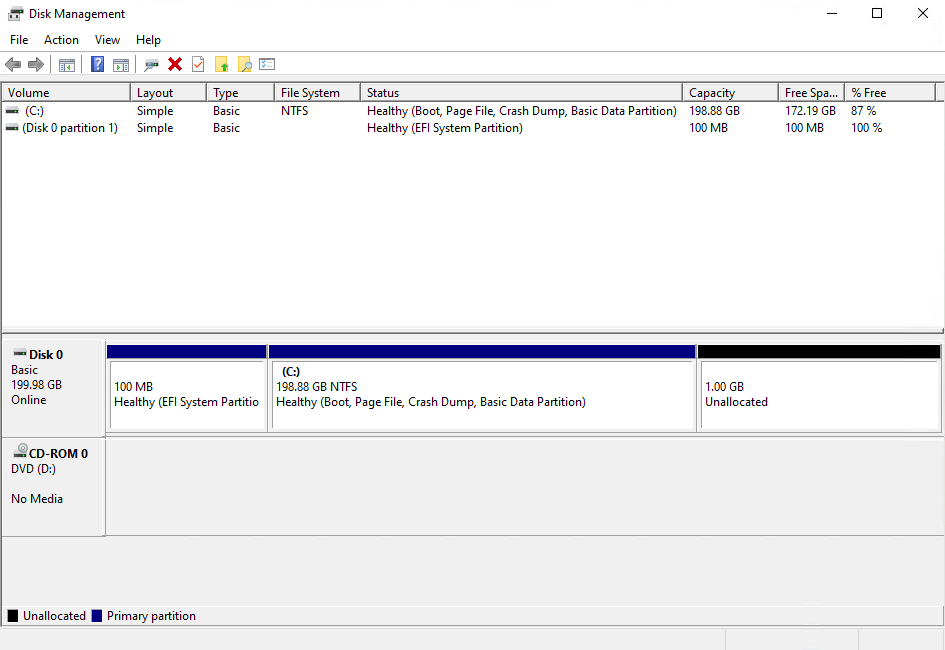
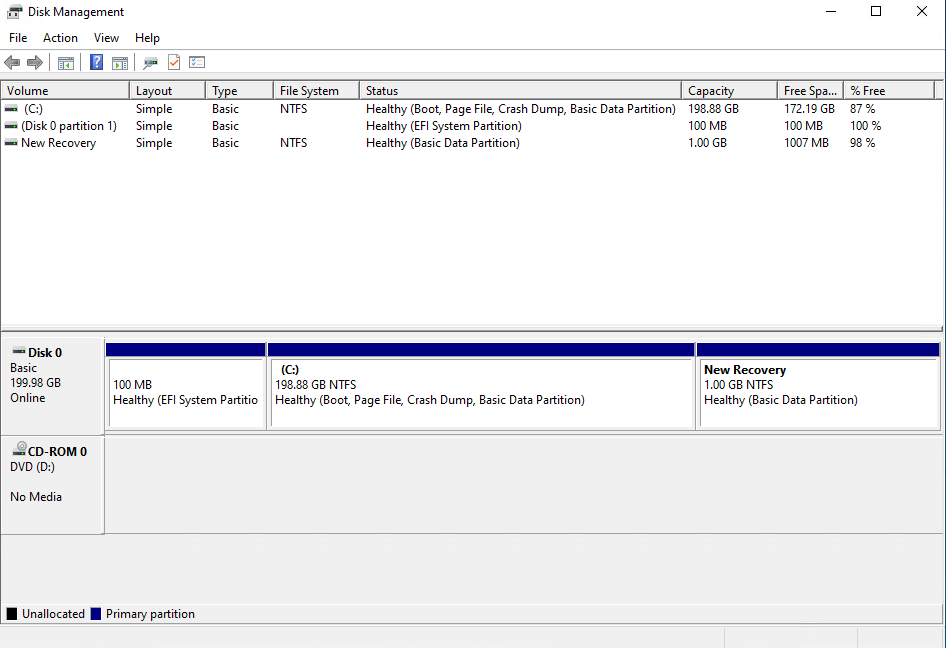
This is what my partitions look like in Disk Management.

We will move the 1 GB recovery partition to the end of the disk allowing us to add the 50 GB of unallocated space to the C drive.
The Process
- Make sure you have a backup of the system you are going to edit the partitions on.
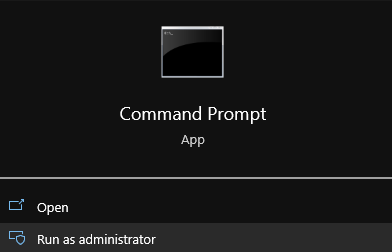
- Open Command Prompt as admin
Disabling The Windows Recovery Partition
- We need to disable the existing Windows Recovery Partition to do that run the command
reagentc /disable

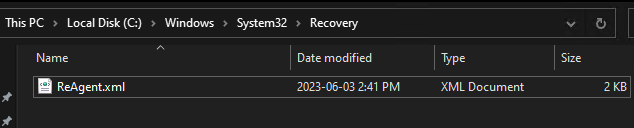
The reagentc /disable command will disable the recovery partition and will move the recovery partition into a file named Winre.wim and will be located in C:\Windows\System32\Recovery (you have to enable showing hidden system files if you want to see it)

DiskPart
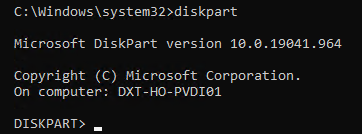
- Run the command
diskpartto launch DiskPart
- List the disks in your system. You can do this by using the command
list disk
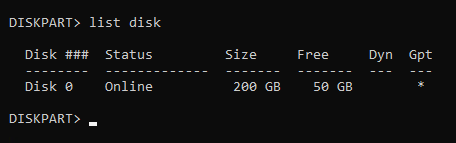
Pro tip from Matt in the comments, if there’s a * in the column for Gpt that means the disk is likely a GPT disk and if there isn’t a * in the Gpt column the disk is likely MBR. Make a note of this as it will be important further down.
- Select the disk you need to move the recovery partition on. You can do this by using the command
select diskand the disk number. In my setup disk 0 was the correct disk and the command I entered wasselect disk 0.
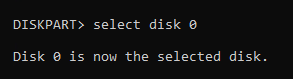
- List the partitions on that disk. You can do this by using the command
list partition
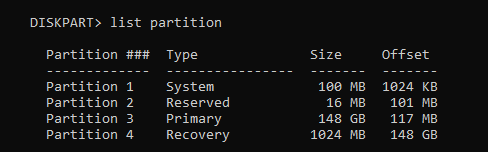
- Select the recovery partition. You can do this by using the command
select partitionand the partition number. In my setup partition 4 is my recovery partition and the command I entered wasselect partition 4

The recovery partition is a protected partition so we need to use a bit more force to delete it.
- Force the deletion of the recovery partition. You can do this by using the command
delete partition override

Disk Management
Now if you look in Disk Management you should no longer have the Recovery Partition and it should show up as unallocated.
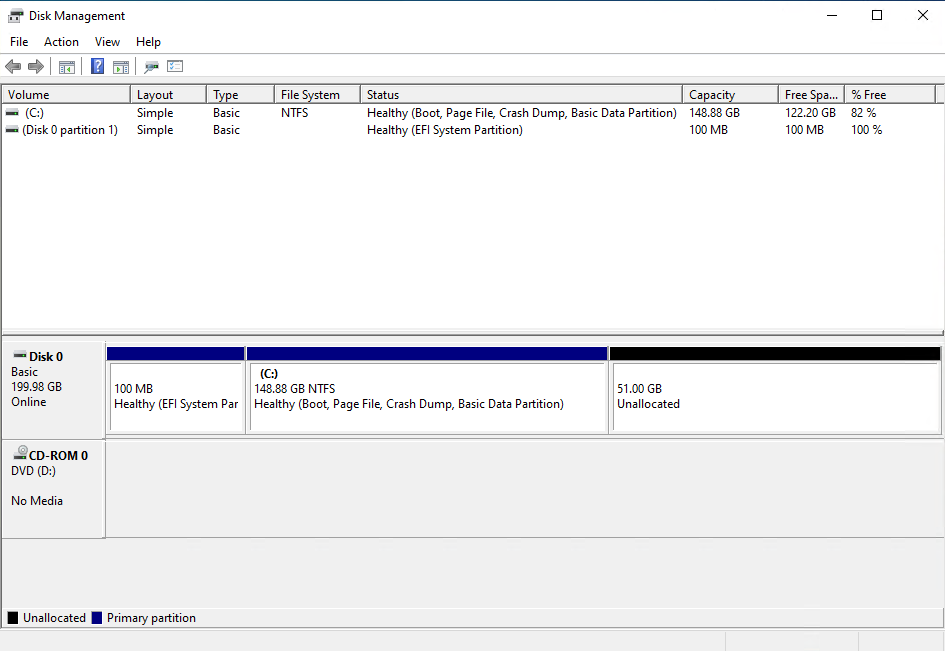
- Expand your disk and leave about 1024 MB off your resized size to leave room for the re-enabling the Recovery Partition.
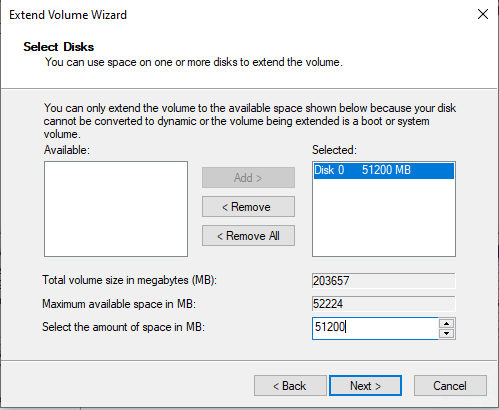
Disk Management should now look something like this.
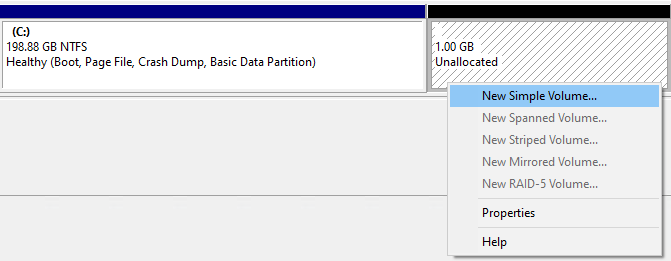
Once the disk is expanded we need to rebuild everything that is needed for Windows to know that the extra space that we left unallocated can be used to for the recovery partition.
- Create a New Simple Volume with the unallocated space.
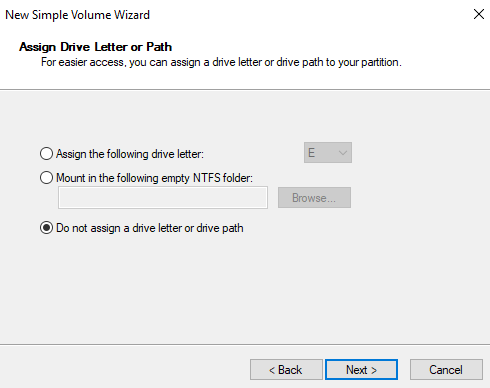
- Don’t give it a drive letter.
- You can give the new partition a name if you want it does not mater. I’m going to call mine New Recovery.
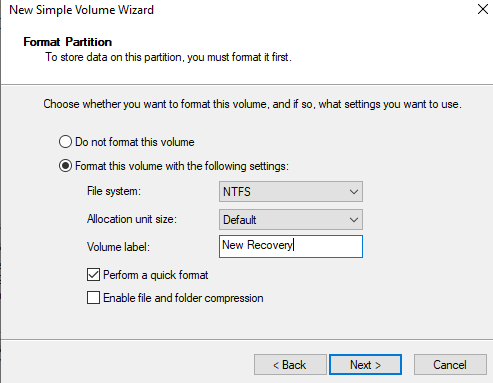
Disk Management should now look something like this.
Back to DiskPart
- In DiskPart list your partitions again by running the command
list partition
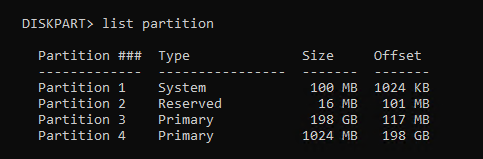
- Select the 1024 MB partition with the command
select partitionand the partition number. In my setup it was partition 4 and the command I ran wasselect partition 4
If you have a GPT disk you need to run some very specific command and if you have an MBR disk you need to run different very specific commands.
GPT disk
On GPT disks we need to change the partition ID to de94bba4-06d1-4d40-a16a-bfd50179d6ac which tells Windows that this is a recovery partition
- Run the following command to set the partition as a recovery partition
set id=de94bba4-06d1-4d40-a16a-bfd50179d6ac

We also need to hide the drive and flag it as a required partition to do that we have to set a GPT attribute to 0x8000000000000001
- Run the following command to set the GPT attribute to hide the drive and flag it as required
gpt attributes=0x8000000000000001

- Now we can exist DiskPart.
MBR disk
On MBR disks we need to change partition ID to 27 which will tell Windows that this is a recovery partition.
- Run the following command to set the partition as a recovery partition
set id=27

- Now we can exist DiskPart.
Enabling The Windows Recovery Partition
- Now we can re-enable the recovery partition by running the command
reagentc /enable

The reagentc /enable command will copy the Winre.wim file from C:\Windows\System32\Recovery into our new recovery partition.
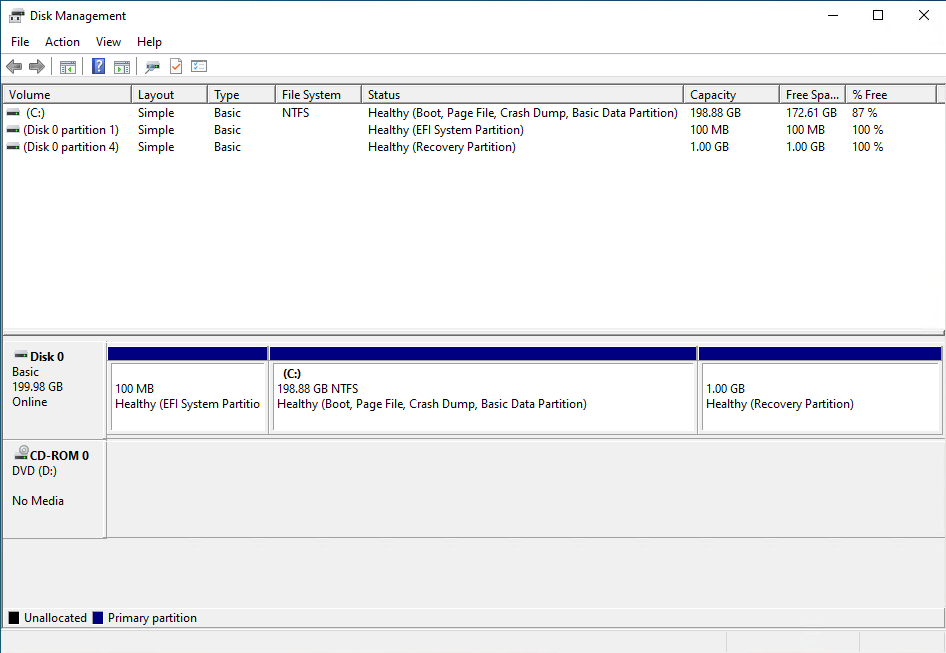
If you look at Disk Management again everything shows up correctly.
That’s all there is to it.